Add Any Resource to Gridware Cluster Scheduler / Open Cluster Scheduler (fka Sun Grid Engine) (2025-12-22)
GCS/OCS provides a flexible resource management system that has been refined over many years. Integrating new resources—whether quantum computers, tape libraries, cloud instances, hardware emulators, or something else entirely—follows a consistent pattern. Here's how it works.
Step 1: Define the Resource Type
Resources are defined in the complex configuration. To see what's already configured:
qconf -sc
To add new resources, you have two options:
Interactive editing:
qconf -mc
File-based editing:
qconf -sc > myresources
# edit myresources
qconf -Mc ./myresources
Each resource definition requires several attributes:
- name and shortcut – how you refer to it
- type –
MEMORY,INT,DOUBLE,BOOL,RSMAP, etc. - requestable – whether jobs can request it via
qsub -l - default – typically
0; note that a non-zero default gets implicitly added to every job request - consumable – whether the scheduler should decrement the available amount when scheduling jobs
Step 2: Initialize Resource Values
This step is optional but necessary for limited, consumable resources like GPUs or licenses. The key decision is where to initialize (within the complex_values field):
Global level – resource is available cluster-wide, independent of where the job runs:
qconf -me global
Host level – resource is attached to a specific execution host:
qconf -me <hostname>
Queue instance level – finer granularity than host; useful when different queues on the same host have different resource allocations:
qconf -mq <queuename>
In each case, add your resource to the complex_values field. For queue-level configuration, you can either set a value for all instances or use bracket notation to target specific queue instances on specific hosts.
Check the resource availability with qstat -F resourcename
Step 3: Request the Resource
Jobs request resources using the -l option:
qsub -l qpu=1 myjob.sh
To inspect what was requested and granted:
qstat -j <jobid>
The job environment receives granted resources as variables with the SGE_HGR_ (hard) or SGE_SGR_ (soft) prefix. Your job script can use these to configure itself appropriately.
Further Integration: Prolog and Epilog Scripts
For many resources, there's additional work required to actually access or release them. This is handled through prolog and epilog scripts configured in the queue configuration.
Prolog scripts typically:
- Read
SGE_HGR_*environment variables (which display the (hard) granted resources) - Interact with the resource (acquire locks, initialize hardware, provision cloud instances)
- Write additional environment variables to the job's environment file
Epilog scripts typically:
- Release or de-register the resource
- Collect consumption metrics (power usage, costs, runtime statistics)
- Update the resource usage file so consumption data appears in
qacct -joutput
This last point integrates directly with the extensible JSONL accounting system, making resource consumption visible and auditable.
The Starter Method
Another frequently used hook is the starter_method. Configure it in the queue with a path to a script or binary. Instead of executing the job directly, the execution daemon calls this starter script with the job script and its arguments as parameters.
From there, it's up to your starter script to:
- Prepare the environment
- Perform any setup required for the resource
- Launch the actual job as a child process
Since the starter script inherits all job-related environment variables (including granted resources) and receives the job command line as arguments, it has everything needed to wrap job execution transparently.
A common use case: running jobs inside containers without requiring users to modify their job scripts. The starter method can invoke Apptainer, Enroot, or any other container runtime, passing the job script as the container's entry point. Users submit normal jobs; the infrastructure handles containerization.
Load Sensors
Load sensors provide dynamic information about resource states—temperatures, shared storage capacity, network utilization, or any other metric that changes over time.
They're scripts or binaries that the execution daemon triggers at configurable intervals. Each invocation reports the current value of one or more resources. These values can be provided whether or not the resource is initialized with a static value at the global, host, or queue instance level.
Load sensor data is useful for:
- Users checking cluster status before submitting jobs
- Administrators monitoring infrastructure health
- The scheduler detecting overloaded resources and automatically putting them into alarm state
With these interfaces—complex configuration, prolog/epilog scripts, the starter method, and load sensors—you can integrate any resource, independent of what that resource actually is.
Gridware Cluster Scheduler / Open Cluster Scheduler 9.0.10 Available (2025-12-15)
Gridware Cluster Scheduler 9.0.10 based on Open Cluster Scheduler 9.0.10 (fka. Grid Engine) is now available. This is a patch release with fixes accumulated over the last month.
If you want to give Open Cluster Scheduler a try in a VM or container, the one-line installer has been updated as well. If you want to test a multi-node setup within local containers, the repo now contains an example based on Docker Compose.
git clone https://github.com/hpc-gridware/quickinstall
cd quickinstall/containers/openSUSE/15.6
docker compose up -d
Wait a short while until installation is finished (1–2 minutes).
docker exec -it ocs-master bash
ocs-master:/ # su - gridware
gridware@ocs-master:~> qhost
HOSTNAME                ARCH         NCPU NSOC NCOR NTHR  LOAD  MEMTOT  MEMUSE  SWAPTO  SWAPUS
----------------------------------------------------------------------------------------------
global                  -               -    -    -    -     -       -       -       -       -
ocs-master              lx-arm64       14    1   14   14  0.33   11.7G    1.4G   12.7G     0.0
ocs-worker1             lx-arm64       14    1   14   14  0.34   11.7G    1.4G   12.7G     0.0
ocs-worker2             lx-arm64       14    1   14   14  0.34   11.7G    1.4G   12.7G     0.0
gridware@ocs-master:~> qsub -b y sleep 123
Your job 1 ("sleep") has been submitted
gridware@ocs-master:~> qstat -f
queuename                      qtype resv/used/tot. load_avg arch          states
---------------------------------------------------------------------------------
all.q@ocs-master               BIP   0/1/14         0.32     lx-arm64
         1 0.55500 sleep      gridware     r     2025-12-15 10:14:43     1
---------------------------------------------------------------------------------
all.q@ocs-worker1              BIP   0/0/10         0.32     lx-arm64
---------------------------------------------------------------------------------
all.q@ocs-worker2              BIP   0/0/10         0.32     lx-arm64
gridware@ocs-master:~> qstat -j 1
...
To munge or not to munge (2025-11-6)
Gridware Cluster Scheduler supports munge authentication in daily builds since a while, bringing enhanced security to containerized workloads. This widely-adopted service runs as a separate daemon, verifying real UID/GID for cluster tools like qsub and qrsh across multi-node environments.
The security benefits are particularly valuable when allowing user namespaces for containers, ensuring safe operation without authentication compromises. Best of all, installation couldn't be simpler—just add the -munge flag to your installer command:
./inst_sge -munge -m ...
For anyone running containerized HPC workloads, munge support is highly recommended and easy enough that the answer to "to munge or not to munge" is clearly: munge.
Multi-Node Concepts: From Grid Engine Legacy to the AI Age (2025-09-29)
Grid Engine introduced the parallel job concept to the scheduler domain decades ago, laying the foundational groundwork. In today's AI age, multi-node computations are the essential building blocks that allow us to train, finetune, and run inference at scale.
But the complexity hasn't disappeared—it's just shifted. When you need to understand the precise internal concepts behind robust, scalable multi-node job orchestration in modern environments, please check out my latest post over at hpc-gridware.com.
We take a deep dive into the Gridware Cluster Scheduler / Open Cluster Scheduler machinery that makes distributed computing reliable:
- PEs and Allocation Rules: How the Parallel Environment dictates slot distribution (e.g.,
$fill_upvs.$round_robin) and controls your resource footprint. - The Consumable Logic: A detailed look at how to define and request resources using different
consumablescopes (YES,HOST,JOB) to manage everything from memory to licenses. - Controlling the Slaves: The critical role of
qrsh -inheritandcontrol_slavesin enforcing per-node resource limits and ensuring complete job cleanup. - RSMAP for Specialized Resources: Managing non-uniform resources like GPUs, network devices, and ports with the powerful RSMAP resource type.
This is the technical knowledge required to move your multi-node jobs from basic execution to optimized, production-grade workflows.
Read the full post on multi-node job concepts: here
From Sun Grid Engine to Gridware Cluster Scheduler: Why Job Priority Configuration Still Matters (2025-07-25)
The job priority system that was refined over years continues to be one of the most sophisticated features in Open Cluster Scheduler and its fully supported companion, Gridware Cluster Scheduler. Yet it's also one of the most underutilized capabilities in many HPC environments.
After working with countless Grid Engine deployments over the years, and now helping organizations transition to Open Cluster Scheduler and Gridware Cluster Scheduler, I've noticed that while administrators often get comfortable with basic queue configuration, they rarely explore the priority configuration mechanisms that can fundamentally change how their clusters serve organizational needs.
Why This Matters Now
In today's HPC landscape, compute resources aren't just expensive—they're strategic business assets. But it's not just about hardware costs; application license costs can easily exceed hardware expenses, with software licenses often running into hundreds of thousands of dollars or more annually. The difference between an optimally configured priority system and default settings can mean the difference between meeting critical deadlines and missing them entirely—while licensed applications sit idle.
The challenge isn't technical complexity. The real challenge is aligning technical capabilities with business requirements. We've seen environments where expensive GPU clusters and costly application licenses remain underutilized while urgent jobs wait in queue, simply because the priority system wasn't configured to reflect organizational priorities and license economics.
The Evolution Continues
What makes this discussion particularly timely is that good old Sun Grid Engine has found new life as Open Cluster Scheduler, with its fully supported companion, Gridware Cluster Scheduler. This isn't just a rebranding—it's a revitalization of the entire Grid Engine ecosystem for modern computing environments.
The priority system remains at the heart of both platforms, but now it's paired with active development, modern container integration, enhanced GPU support, and enterprise backing that organizations need for critical production deployments.
Dive Deeper
The priority system combines share trees, functional policies, override mechanisms, and urgency calculations through a sophisticated weighting system that creates dynamic fairness while ensuring important projects get the resources they need.
If you're ready to optimize your cluster's priority configuration, I've put together a guide that walks through the mathematical foundations, configuration examples, and real-world implementation strategies: Understanding Job Priority Configuration in Gridware Cluster Scheduler.
Quick & Dirty Open Cluster Scheduler 9.0.5 Install Script (2025-05-04)
Update (July 21, 2025): Newer versions are now available! You can install OCS 9.0.6 or 9.0.7 for testing using:
curl -s https://raw.githubusercontent.com/hpc-gridware/quickinstall/refs/heads/main/ocs.sh | OCS_VERSION=9.0.7 shIf you want to give Open Cluster Scheduler (OCS) 9.0.5 a quick spin without following the whole doc, I've built a simple shell installer. It's for single-node (qmaster/execd) setups. Feel free to add more execds later.
Heads up:
Don't expect this script to work on every distro or minimal OS install without a hitch. You might hit a missing package, lack of man pages, or a small OS quirk. If you run into trouble, please comment in the gist. If it works, give it a like!
How to quick-try (be sure to review the script first!):
curl -s https://gist.githubusercontent.com/dgruber/c880728f4002bfd6a0d360c7f6a27de1/raw/install_ocs_905.sh | sh
or
wget -O - https://gist.githubusercontent.shcom/dgruber/c880728f4002bfd6a0d360c7f6a27de1/raw/install_ocs_905.sh | sh
Again: Please check the script before you run it.
For a serious, production install (with full details and user setup), refer to the official documentation bundled in the OCS doc packages.
Podcast 2: Gridware Cluster Scheduler & Open Cluster Scheduler 9.0.5 (2025-04-16)
I'm excited to share our latest podcast, which explores the release of Gridware Cluster Scheduler 9.0.5 — built on the new Open Cluster Scheduler 9.0.5! Once again, I turned to NotebookLM to generate a dynamic conversation based entirely on our latest release notes and blog posts. In true Grid Engine tradition, I made sure to double-check everything for accuracy, and the result is a concise, informative episode that captures all the key improvements of this major release.
If you're interested in what's new in 9.0.5, how adopting the Open Cluster Scheduler as our foundation strengthens Gridware, or what this means for current and future users, I think you'll really enjoy this episode.
As always, let us know what you think. It’s inspiring to see how AI can help us tell our story even better—while ensuring the technical details are spot-on. Stay tuned for more updates from the Grid Engine and HPC community!
Blog Post About Efficient NVIDIA GPU Management in HPC and AI Workflows with Gridware Cluster Scheduler (2025-04-13)
Over at HPC Gridware I recently published a blog post highlighting how Gridware Cluster Scheduler (formerly known as "Grid Engine") can significantly simplify GPU management and maximize efficiency in HPC and AI environments.
In the post, we cover exciting new capabilities and improvements, including intelligent scheduling to ensure your valuable GPUs never stay idle, automated GPU setup with simple one-line prolog and epilog scripts, and comprehensive per-job GPU monitoring with detailed accounting metrics. We also walk through integrated support for NVIDIA’s latest ARM-based Grace Hopper and Grace Blackwell platforms, showcasing Gridware’s flexibility for modern hybrid compute clusters with mixed compute architectures.
Additionally, The article provides hands-on examples, such as running GROMACS workloads seamlessly on the new NVIDIA architecture, and integrating NVIDIA containers effortlessly using Enroot. To further improve visibility and operational efficiency, Gridware now supports exporting key GPU metrics to Grafana.
Interested in ensuring your GPUs are always working at full capacity while keeping management complexity at bay? Check out the full blog post on HPC Gridware for all the details!
Discover Valuable HPC / AI Cluster Insights in 5 Minutes Using qtelemetry (2025-02-16)
Observability in HPC and AI clusters continues to evolve, and we’re thrilled to introduce qtelemetry, now in developer preview. This new tool provides deep insight into your Gridware Cluster Scheduler (GCS) environment in just a few minutes. Best of all, it can even work with legacy Grid Engine clusters when needed.
Introducing qtelemetry
qtelemetry streamlines HPC observability by simplifying integrations with tools like Prometheus and Grafana. Key features include:
• Effortless time series integration: Quickly connect your cluster to Prometheus and Grafana.
• Customizable sample dashboards: Keep an eye on jobs overview, hosts overview, and queue metrics.
• Outlier detection: Instantly flag non-functional hosts or jobs stuck in an error state.
• Resource monitoring: Track host loads including CPU, memory, GPU availability, and custom resources.
• sge_qmaster supervision: Monitor critical daemons (e.g., qmaster CPU/memory usage) and spooling filesystem performance.
• Containerized observability stack: Integrates smoothly with container-based deployments for flexible HPC environments.
If you’re eager to try qtelemetry, simply contact us at HPC Gridware!
Seamless Integration with Prometheus & Grafana
Setting up observability for your HPC or AI clusters has never been simpler. qtelemetry lets you feed GCS metrics directly into Prometheus for comprehensive monitoring:
Connect to Prometheus: Collect crucial metrics (host load, memory usage, GPU availability, etc.) transparently in Prometheus.
Visualize with Grafana: Our sample dashboards offer quick snapshots of job states, host performance, and queue details. Customize them to suit your environment.
Alerting & Outlier Detection: Use Grafana’s alerting capabilities to stay on top of failed jobs, overloaded hosts, or daemon performance issues.
Sample Dashboard Examples
Our developer preview comes with sample dashboards to give you immediate visibility into essential HPC metrics:

Figure: A cluster global summary showing the amount of execution hosts, sockets, cores, compute threads, and NVIDIA GPUs available in the cluster along with an overview about running jobs per node.

Figure: Cluster global jobs overview including different states and the possibility to group by waiting time to easily detect if jobs get stuck.

Figure: A cluster queue slots summary view known from qstat -f.

Figure: Monitor CPU load, memory usage, and GPU availability for all hosts.
These intuitive dashboards ensure you can quickly identify non-responsive hosts or stuck jobs, helping your HPC cluster run smoothly.
Get Started with qtelemetry
Ready to unlock valuable cluster insights in just minutes? The qtelemetry developer preview is now available. Connect your Gridware Cluster Scheduler to Prometheus, load our pre-built Grafana dashboards, and begin monitoring your environment.
For additional information or to arrange a demo, please reach out to us at HPC Gridware. We’re excited to help you gain greater visibility into your HPC and AI workloads.
Happy monitoring!
Daniel
HPC Gridware
Introducing Flexible Accounting in Gridware Cluster Scheduler: Collect Arbitrary Job Metrics (2025-02-09)
Ever dreamed of capturing custom metrics for your jobs—like user-generated performance counters or application-specific usage data—directly in your accounting logs? Gridware Cluster Scheduler (and its open source companion, Open Cluster Scheduler) just made it a reality with brand-new “flexible accounting” capabilities.
Why Flexible Accounting Matters
In HPC environments, traditional accounting systems can be limiting. They typically capture CPU time, memory usage, perhaps GPU consumption—yet your workflow might demand more: e.g., analyzing model accuracy, network throughput, or domain-specific metrics. With Gridware’s flexible accounting, you can insert arbitrary fields into the system’s accounting file, just by placing a short epilog script in your queue configuration. Then, whenever you run qacct -j <job_id>, these additional metrics appear neatly alongside standard resource usage.
How It Works
In essence, the cluster scheduler calls a admin-defined epilog after each job completes. This small script (it can be in Go, Python, or any language you like) appends as many numeric "key-value" pairs as you wish to the scheduler’s accounting file. For example, you might measure data from your application’s logs (say, images processed or inference accuracy), then push those numbers right into the accounting system. The code snippet below (in Go) demonstrates how easily you can add random metrics—just replace them with values drawn from your own logic:
package main

import (
    "fmt"

    "github.com/hpc-gridware/go-clusterscheduler/pkg/accounting"
    "golang.org/x/exp/rand"
)

func main() {
    usageFilePath, err := accounting.GetUsageFilePath()
    if err != nil {
        fmt.Printf("Failed to get usage file path: %vn", err)
        return
    }
    err = accounting.AppendToAccounting(usageFilePath, []accounting.Record{
        {
            AccountingKey:   "tst_random1",
            AccountingValue: rand.Intn(1000),
        },
        {
            AccountingKey:   "tst_random2",
            AccountingValue: rand.Intn(1000),
        },
    })
    if err != nil {
        fmt.Printf("Failed to append to accounting: %vn", err)
    }
}
Once you have defined your epilog you need to configure it in the cluster queue configuration (qconf -mq all.q).
epilog sgeadmin@/path/to/flexibleaccountingepilog
Here the sgeadmin is the installation user of Gridware / Open Cluster Scheduler as he has the right permissions to do that.
Finally accepting the new values in that particular format in the system needs to be enabled globally (qconf -mconf).
reporting_params ... usage_patterns=test:tst*
Here we allow tst prefixed values which are then stored in the internal JSONL accounting file in the "test" sections.
That’s all—no core scheduler modifications needed. Run your jobs normally, let them finish, then check out your new columns in qacct.
Unlocking More Insights
This feature is particularly powerful for HPC clusters applying advanced analytics. Need to track per-user image accuracy scores or data ingestion rates? Or capture domain-specific variables for auditing and compliance? Flexible accounting provides a simple, robust mechanism to store all that data consistently.
And remember: Open Cluster Scheduler users get these same advantages—just take care of a little manual configuration. Because this functionality is unique to Gridware and Open Cluster Scheduler, you won’t find it in other legacy Grid Engine variants.
Conclusion
Spend less time mashing logs together and more time exploring richer cluster usage data. Flexible accounting transforms ordinary HPC accounting into a full-blown, customizable metrics infrastructure. Whether you’re fine-tuning AI workflows or verifying compliance, you now have the freedom to store precisely the information you need—right where you expect to see it.
Gridware Cluster Scheduler Upgrades: Faster, Smarter, and Ready for AI Workloads (2025-01-20)
If you’re managing HPC or AI clusters with Grid Engine, scalability is probably your daily obsession. As core counts explode and workloads grow more complex, the Gridware Cluster Scheduler (GCS) just leveled up to keep pace—and here’s why it matters to you.
What’s Changed?
We’ve rebuilt core parts of GCS to tackle bottlenecks head-on. Let’s break down what’s new:
1. Self-Sustaining Data Stores
- Problem: The old monolithic data store couldn’t handle parallel requests efficiently. Think authentication delays or
qstatqueries clogging the system. - Fix: We split the data store into smaller, independent components. For example, authentication now runs in its own thread pool, fully parallelized. No more waiting for the main scheduler to free up.
- Result: Need to submit 50% more jobs per second? Done. Query job status (
qstat -j), hosts (qhost), or resources (qstat -F) 2.5x faster? Check.
2. Cascaded Thread Pools
- How it Works: Tasks are split into sub-tasks, each handled by dedicated thread pools. Think of it like assembly lines for requests—auth, job queries, node reporting—all running in parallel.
- Why It Matters: Even under heavy load, GCS now processes more requests without choking. We measured 25% faster job runtimes in tests, even with heavier submit rates.
3. No More Session Headaches
- Old Pain: Ever had a job submission finish but
qstatnot see it immediately? Traditional WLMs make you manage sessions manually. - New Fix: GCS auto-creates cross-host sessions. Submit a job, query it right after—no extra steps. Consistency without the fuss.
Why AI/ML Clusters Win Here
AI workloads aren’t just about GPUs—they demand massive parallel job submissions, rapid status checks, and resource juggling. These upgrades mean:
- Faster job throughput: Submit more training jobs without queue lag.
- Instant resource visibility:
qstat -Forqconfqueries won’t slow down your workflow. - Scalability: Handle thousands of nodes reporting status (thanks,
sge_execd!) without bottlenecking the scheduler.
What’s Next?
We’re eyeing predictive resource scheduling (think ML-driven job forecasting) and better GPU/CPU hybrid support. But today’s updates already make GCS a reliable solutions for modern clusters.
Try It Yourself
The Open Cluster Scheduler code is on GitHub, with prebuilt packages for:
- Linux:
lx-amd64,lx-arm64,lx-riscv64,lx-ppc64le,lx-s390x - BSD:
fbsd-amd64 - Solaris:
sol-amd64 - Legacy Linux:
ulx-amd64,xlx-amd64
Download Links:
For Grid Engine users, this isn’t just an upgrade—it’s a toolkit built for the scale AI and HPC demand. Test it, push it, and let us know how it runs on your cluster.
Dive deeper into the technical details here.
Questions or feedback? Reach out—we’re all about making Grid Engine work harder for you.
Mastering GPUs with Open Cluster Scheduler (2024-07-1)
Mastering GPUs with Open Cluster Scheduler's RSMAP
Check out the full article here.
Unlock the full potential of your GPU resources with Open Cluster Scheduler's latest feature — Resource Map (RSMAP). This powerful and flexible resource type ensures efficient and conflict-free utilization of specific resource instances, such as GPUs.
Why Choose RSMAP?
- Collision-Free Use: Ensures exclusive access to resources, preventing conflicts between jobs.
- Detailed Monitoring & Accounting: Facilitates precise tracking and reporting of actual resource usage.
- Versatile Resource Management:
- Host-Level Resources: Manage local resources such as port numbers, GPUs, NUMA resources, network devices, and storage devices.
- Global Resources: Manage network-wide resources like IP addresses, DNS names, license servers, and port numbers.
Example: Efficient GPU Management
Define Your GPU Resource: Begin by opening the resource complex configuration using
qconf -mcand add the following line:GPU gpu RSMAP <= YES YES NONE 0This defines a resource named
GPUusing the RSMAP type, marking it as requestable and consumable with specific constraints.Initialize Resource on Hosts: Assign values to the GPU resources on a specific host by modifying the host configuration with
qconf -me <hostname>. For a host with 4 GPUs:complex_values GPU=4(0 1 2 3)This indicates the host has 4 GPU instances with IDs 0, 1, 2, and 3.
Submit Your Job: Request GPU resources in your job script:
#!/bin/bash
env | grep SGE_HGR
Submit the job with the command:
qsub -l GPU=2 ./job.shYour job will now be allocated the requested GPU resources, which can be confirmed by checking the output for granted GPU IDs. Convert these IDs for use with NVIDIA jobs:
export CUDA_VISIBLE_DEVICES=$(echo $SGE_HGR_GPU | tr ' ' ',')
This innovative approach to resource management enhances both performance and resource tracking, making it a must-have for efficient computing. Plus, HPC Gridware set to release a new GPU package featuring streamlined configuration, improved GPU accounting, and automated environment variable management, taking the hassle out of GPU cluster management.
For more detailed information, check out the full article here. It's your go-to guide for mastering GPU management with the Open Cluster Scheduler!
Kubernetes Topology Manager vs. HPC Workload Manager (2020-04-15)
Looks like another gap between Kubernetes and traditional HPC scheduler is solved: Kubernetes 1.18 enables a new feature called Topology Manager.
That’s very interesting for HPC workload since the process placements on NUMA machines have a high impact for compute, IO, and memory intensive applications. The reasons are well known:
- access latency differs - well, it is NUMA (non-uniform memory access)!
- when processes move between cores and chips, caches needs to be refilled (getting cold)
- not just memory, also device access (like GPUs, network etc.) is non-uniform
- device access needs to be managed (process which runs on a core needs should access a GPU which is close to the CPU core)
- when having a distributed memory job all parts (ranks) should run with the same speed
In order to get the best performance out of NUMA hardware, Sun Grid Engine introduced around eleven years ago a feature which lets processes get pinned to cores. There are many articles in my blog about that. At Univa we heavily improved it and created a new resource type called RSMAP which combines core binding with resource selection, i.e. when requesting a GPU or something else, the process gets automatically bound to cores or NUMA nodes which are associated with the resource (that’s called RSMAP topology masks). Additionally the decision logic was moved away from the execution host (execution daemon) to the central scheduler as it turned out to be necessary for making global decisions for a job and not wasting time and resources for continued rescheduling when local resources don’t fit.
Back to Kubernetes.
The new Kubernetes Topology Manager is a component of Kubelet which also takes care about these NUMA optimizations. That it is integrated in Kubelet, which runs locally on the target host is the first thing to note.
As Topology Manager provides a host local logic (like in Grid Engine at the beginning) it can: a.) make only host local decisions and b.) lead to wasted resources when pods needs to be re-scheduled many times to find a host which fits (if there is any). That’s also described in the release notes as a known limitation.
How does the Topology Manager work?
The Topology Manager provides following allocation policies: none, best-effort, restricted, and single-numa-node. These are kubelet flags to be set.
The actual policy which is applied to the pod depends on the kubelet flag but also on the QoS class of the pod itself. The QoS class of the pod depends on the resource setting of the pod description. If cpu and memory are requested in the same way within the limits and requests section then the QoS class is Guaranteed. Other QoS classes are BestEffort and Burstable.
The kubelet calls so called Hint Providers for each container of the pod and then aligns them with the selected policy, like checking if it works well with single-numa-node policy. When set to restricted or single-numa-node it may terminate the pod when no placement if found so that the pod can be handled by external means (like rescheduling the pod). But I’m wondering if that will work when having side-car like setups inside the pod.
The sources of the Topology Manager are well arranged here: https://github.com/kubernetes/kubernetes/blob/master/pkg/kubelet/cm/topologymanager
In order to summarize. A bit complicated since I can’t really find the decision logic of the hint provider documented and so the source code will be the source of truth. Also, since it is a host local decision it will be pain for distributed memory jobs (like MPI jobs). Maybe they move the code one day to the scheduler, like it was done in Grid Engine. It is really good that Kubernetes takes now also care about those very specific requirements. So, it is still on the right way to catch up with all required features for traditional HPC applications. Great!
At UberCloud we closely track Kubernetes as platform for HPC workload and are really happy to see developments like the Topology Manager.
Using Open Containers with runc in a Univa Grid Engine Compute Cluster (2015-06-28)
runc is a tool written in Go which is creating and starting up a Linux container according to the OCF specification. Its source code repository can be found here.
If you have a Go development environment then building it is very simple - just follow the instructions in the README (they are using a Makefile which internally calls godep, the standard tool for handling package dependencies in Go / probably you need to install it as well).
After installing the single runc binary you are able to startup containers right on the command line by pointing runc to a JSON description of the container. The container itself obviously also needs to be on the file system in order to chroot to it (which is done by runc). One major difference to Docker itself is that it does not do any kind of image management, but probably this is not required in case you have a good shared filesystem.
How to use runc in Univa Grid Engine
After runc is verified to run on command line it is time to use it under the control of Univa Grid Engine in order to exploit your compute clusters resources.
The integration can be very straight forward depended in what you want to achieve. I keep it here as simple as possible.
First of all you want to submit the container described by the Open Container Format (OCF) as JSON description to Univa Grid Engine and probably also use the resource management system of Grid Engine for handling cgroups and other limitations. This is possible since all container processes are children of runc - no daemon here is in play.
In order to setup running runc you can override the starter_method in the Univa Grid Engine queue configuration (qconf -mq all.q for example). The starter method is executed on the compute node in oder to start up the job. Unfortunately runc requires root privileges and the starter method is started as user. Therefore a sudo is required. Note that running a privileged process is always a security risk, but I’m always fearless on my private cluster on my laptop!!!
Point the starter_method (in the queue configuration like qconf -mq all.q) to the path where you have following script:
#!/bin/sh
sudo /usr/local/bin/runc --id "$JOB_ID" $@
Depending of your use case you need to allow that runc can run as root without requiring a password. This would be required in any case when running in batch mode.
Example using visudo:
daniel ALL=(ALL) NOPASSWD: /usr/local/bin/runc
You can also use user groups instead of specifying users.
A quick check:
$ sudo runc
JSON specification file for container.json not found
Switching to a directory where I have a container.json :
$ sudo runc
/ $ exit
Now, lets submit an interactive job. The pty switch is required when submitting a JSON file but requiring a shell.
I’m using the busy box image which is the example of runc README on github.
$ ls
busybox.tar  container.json  rootfs  runc
Now I want to run the container on my cluster using a my shared filesystem.
$ qrsh -pty y -cwd container.json
/ $ ps -ef
PID   USER     COMMAND
    1 daemon   sh
   7 daemon   ps -ef
/ $ ls -lsiah
total 56
 1999621      4 drwxr-xr-x   17 default  default     4.0K Jun 23 05:41 .
1999621      4 drwxr-xr-x   17 default  default     4.0K Jun 23 05:41 ..
1992545      0 -rwxr-xr-x    1 default  default        0 Jun 27 15:31 .dockerenv
1992546      0 -rwxr-xr-x    1 default  default        0 Jun 27 15:31 .dockerinit
2007813      4 drwxr-xr-x    2 default  default     4.0K May 22  2014 bin
 846097      0 drwxr-xr-x    5 root     root         360 Jun 28 06:42 dev
2024173      4 drwxr-xr-x    6 default  default     4.0K Jun 27 15:31 etc
2024184      4 drwxr-xr-x    4 default  default     4.0K May 22  2014 home
2024187      4 drwxr-xr-x    2 default  default     4.0K May 22  2014 lib
1992672      0 lrwxrwxrwx    1 default  default        3 May 22  2014 lib64 -> lib
1992673      0 lrwxrwxrwx    1 default  default       11 May 22  2014 linuxrc -> bin/busybox
…
/ $ exit
The PTY request is required otherwise we don’t get the interactive shell together with the command (in our case it is the JSON file). The -cwd argument specifies that the runc is executed in the current directory which removes the need for specifying the full path to the JSON file.
Now we want to run a batch job using this busy box container. Let’s assume our task is executing whoami in the container. You need to create a new JSON file with a different processes section:
5     "processes": [
6         {
7             "tty": false,
8             "user": "root",
9             "args": [
10                 "whoami"
11             ],
12             "env": [
13                 "PATH=/usr/local/sbin:/usr/local/bin:/usr/sbin:/usr/bin:/sbin:/bin",
14                 "TERM=xterm"
15             ],
16             "cwd": ""
17         }
So, tty is set to false. Saving that copy as run.json execution works like following:
$ qsub -cwd -b y ./run.json
Your job 3000000178 ("run.json") has been submitted
$ cat run.json.o3000000178
root
This is just a start. There are many features you can exploit.
This approach works well with Univa Grid Engine's cgroups integration. You can specify the amount of cores allocated for cpuset, main memory limit, and virtual memory limit for example:
$ qsub -binding linear:1 -l m_mem_free=2G,h_vmem=3G -cwd -b y ./run.json
Now the container is under complete control of Univa Grid Engine’s cgroups when it comes to cpu usage and memory usage.
Other possibilities include checkpointing integration with criu. You also need to align requests for Grid Engine with the JSON file which can be done certainly with a JSV script. Also with sudoers file you can limit which containers are allowed to be executed for which user or user group. This can be translated easily to Univa Grid Engine’s job class functionality making usage of containers save and very simple for the user.
Daniel
Grid Engine and Multitenancy (2015-02-22)
Univa Grid Engine can run any workload in your compute cluster. Hence Univa Grid Engine can also easily run Grid Engine as a job. This could be probably required if you want to strictly isolate temporary Grid Engine installations from each other or just want to have some fun with your own scheduler within the scheduler.
To reduce the word count in the article let’s just go through this learning task by using the free Univa Grid Engine trial version which you can download here and follow the recipe in the next sections.
Setup the Grid Engine Demo Enviornment
To start from scratch we need to first setup a demo environment. This is described in an earlier article on my blog. The only requirements are having free Virtual Box and and free Vagrant installed. Then follow the blog for starting it up (copy the demo tar.gz in the directory and do vagrant up - version 8.2.0-demo is required here - for another version you need to adapt). Now you should have a 3 node cluster (3 VMs) running the Univa Grid Engine cluster scheduler.
Next you need to log in (password for vagrant is always vagrant, also for root):
vagrant ssh master

[vagrant@master vagrant]$ qhost
HOSTNAME                ARCH         NCPU NSOC NCOR NTHR NLOAD  MEMTOT  MEMUSE  SWAPTO  SWAPUS
----------------------------------------------------------------------------------------------
global                  -               -    -    -    -     -       -       -       -       -
execd1                  lx-amd64        4    1    4    4  0.01  490.0M   89.5M  928.0M     0.0
execd2                  lx-amd64        4    1    4    4  0.01  490.0M   88.8M  928.0M     0.0
master                  lx-amd64        4    1    4    4  0.05  490.0M  104.3M  928.0M  356.0K
You see 3 compute nodes.
Configure Grid Engine Resources
For running UGE as a job, UGE needs to bootstrap itself. This is an easy task since you can setup a UGE cluster with just one command and a configuration file. The critical point here is the configuration file, since it needs to be adapted depending on which hosts and resources were selected for UGE as a job.
Let’s look at the sample config file (which was used to setup our virtual Grid Engine cluster) here.
There are a few setting we need to adapt dynamically after our UGE was scheduled:
- SGE_ROOT: Of course each UGE needs a different root directory. It must be shared by all nodes which are part of the job / UGE installation.
- SGE_QMASTER_PORT: Needs to be unique as well
- SGE_EXECD_PORT: Also UGE needs to make a unique selection
- SGE_CLUSTER_NAME: Can be derived from the qmaster port.
- GID_RANGE: No overlapping gid range! Otherwise you can cause severe issues in accounting. Let UGE select one for you.
- QMASTER_SPOOL_DIR: Dependent from the SGE_ROOT
- EXEC / SUBMIT / ADMIN_HOST_LIST: All hosts which were selected from UGE
Also note that we are running the job not as root, hence we must disable init script creation. If you want to have a multi-user cluster in this Grid Engine job, than you need to setup the cluster as root.
There are a lot of unique things to select. But this is very easy to configure with the RSMAP resource type in Univa Grid Engine.
Here a sample configuration script which installs these resources in UGE:
#!/bin/sh
qconf -sc > $$.tmp
echo "MT_SGE_ROOT MT_SGE_ROOT RSMAP <= YES JOB 0 0" >> $$.tmp
echo "MT_QMASTER_PORT MT_QMASTER_PORT RSMAP <= YES JOB 0 0" >> $$.tmp
echo "MT_GID_RANGE MT_GID_RANGE RSMAP <= YES JOB 0 0" >> $$.tmp
echo "MT_EXEC_SPOOL MT_EXEC_SPOOL RSMAP <= YES JOB 0 0" >> $$.tmp
qconf -Mc $$.tmp
rm $$.tmp
Just copy and paste that in an editor (vi?) on the master host und run it.
[vagrant@master vagrant]$ vi config.sh
[vagrant@master vagrant]$ ./config.sh
vagrant@master added "MT_SGE_ROOT" to complex entry list
vagrant@master added "MT_QMASTER_PORT" to complex entry list
vagrant@master added "MT_GID_RANGE" to complex entry list
Since three clusters a enough on three virtual hosts to play with, we add now three resources for each type.
[vagrant@master vagrant]$ qconf -mattr exechost complex_values "MT_SGE_ROOT=3(cluster1 cluster2 cluster3)" global
"complex_values" of "exechost" is empty - Adding new element(s).
vagrant@master modified "global" in exechost list
These are our $SGE_ROOT directories. They will appear as subdirectories under /vagrant since it is shared already.
$ qconf -mattr exechost complex_values "MT_QMASTER_PORT=3(2324 2326 2328)" global
These are the portnumbers the UGE installation gets. Note that the execd port will be just qmaster + 1 as this is default convention.
$ qconf -mattr exechost complex_values "MT_GID_RANGE=3(22000 23000 24000)" global
The GID ranges are quite important, please don’t create a conflict with the main UGE installation.
The execd spool directories which needs to exist before a job runs also needs to be selected. (I put that in the Vagrant installation)
$ qconf -mattr exechost complex_values "MT_EXEC_SPOOL=3(local1 local2 local3)" global
That’s it from the main configuration part. The hostnames are dynamically requested and derived from Grid Engine (they will appear in the $PE_HOSTFILE on the master tasks host).
The only thing left is adding a parallel environment so that you can request multiple hosts for your cluster:
$ qconf -ap uge
pe_name                uge
slots                  1000
user_lists             NONE
xuser_lists            NONE
start_proc_args        NONE
stop_proc_args         NONE
allocation_rule        1
control_slaves         FALSE
job_is_first_task      TRUE
urgency_slots          min
accounting_summary     FALSE
daemon_forks_slaves    FALSE
master_forks_slaves    FALSE
Then save…^ZZ
vagrant@master added "uge" to parallel environment list
Allocation rule 1 here means that you basically match execds for your inner UGE installation to slots.
Add it to the all.q:
$ qconf -aattr queue pe_list uge all.q
vagrant@master modified "all.q" in cluster queue list
Finished!
Writing the Job that Sets Your Cluster Up
Here is our job script (job.sh):
Make it executable:
$ chmod +x job.sh
Now submit this script which sets up a user define Grid Engine installation with 2 execution hosts (UGE 2).
$ qsub -N cluster -o /vagrant/UGE/job1.log -j y
-l MT_SGE_ROOT=1,MT_QMASTER_PORT=1,MT_GID_RANGE=1,MT_EXEC_SPOOL=1
-pe uge 2 ./job.sh
With qstat you can see it running:
$ qstat -g t
job-ID     prior   name       user         state submit/start at     queue                          jclass                         master ja-task-ID
-------------------------------------------------------------------------------------------------------------------------------------------------
     1 0.55500 cluster    vagrant      r     02/21/2015 19:00:40 all.q@execd1                                                  MASTER
     1 0.55500 cluster    vagrant      r     02/21/2015 19:00:40 all.q@execd2                                                  SLAVE
With qstat -j 1 you can see some interesting details about the new cluster within you normal cluster:
context:                    STATUS=RUNNING,SETTINGS=/vagrant/cluster1
binding:                    NONE
mbind:                      NONE
submit_cmd:                 qsub -N cluster -o /vagrant/UGE/job.log -j y -l MT_SGE_ROOT=1,MT_QMASTER_PORT=1,MT_GID_RANGE=1,MT_EXEC_SPOOL=1 -pe uge 2 ./job.sh
granted_license       1:
usage                 1:    cpu=00:00:00, mem=0.00000 GBs, io=0.00000, vmem=N/A, maxvmem=N/A
resource map          1:    MT_EXEC_SPOOL=global=(local1), MT_GID_RANGE=global=(22000), MT_QMASTER_PORT=global=(2324), MT_SGE_ROOT=global=(cluster1)
On the resource map entry you can see what the Univa Grid Engine scheduler has selected (port number / cluster name / spooling directories). Also see STATUS=RUNNING in the context - this appears after the installation performed from the job. The settings points to the installation directory, this is used in order to access the new cluster. But first we schedule another cluster, we have one host left.
$  qsub -N cluster -o /vagrant/UGE/job2.log -j y
-l MT_SGE_ROOT=1,MT_QMASTER_PORT=1,MT_GID_RANGE=1,MT_EXEC_SPOOL=1
-pe uge 1 ./job.sh
This job is running as well. Wenn submitting a third, this one stays pending of course since we are using already all hosts (of course you can configure oversubscription).
Now through the SETTINGS information from the job context we are accessing our first inner cluster:
source /vagrant/cluster1/default/common/settings.sh
Doing a qhost gives us two hosts, since we requested two:
[vagrant@master ~]$ qhost
HOSTNAME                ARCH         NCPU NSOC NCOR NTHR NLOAD  MEMTOT  MEMUSE  SWAPTO  SWAPUS
----------------------------------------------------------------------------------------------
global                  -               -    -    -    -     -       -       -       -       -
execd2                  lx-amd64        4    1    4    4  0.02  490.0M  102.5M  928.0M     0.0
master                  lx-amd64        4    1    4    4  0.04  490.0M  124.5M  928.0M  472.0K
Now you can start jobs...
[vagrant@master ~]$ qsub -b y sleep 1234
...doing qstat and qacct etc.
Finally you can go back to your "real" cluster with
[vagrant@master ~]$ source /vagrant/UGE/default/common/settings.sh
Where you only can see your two jobs which sets up UGE clusters.
When you want to delete a cluster, just use qdel.
There is one task left, cleaning up the directories after a cluster as a job finished. It is up to the reader to implement that (using an epilog script?), I just wanted to show here how easy it is to run Univa Grid Engine under Grid Engine. As we have seen the RSMAP resource type (here used as global per job consumable) is a great help here for selecting ports etc.
Also consider to startup the DRMAA2 d2proxy in the newly created cluster in order to access it from home (with ssh tunneling) or use it as a simple multi-cluster access toolkit (which now supports file staging as well).
Further more advanced considerations: start execds with qrsh -inherit (export SGE_ND=1 might help here) for full accounting and process reaping, doing cleanup of directories after the cluster job finished, using transfer queues to forward jobs from original cluster to inner cluster, adding load sensors for tracking usage of inner cluster from main cluster and remove cluster when unutilized, spawn more inner execds with additional job types...
Grid Engine Webinars 2014 (2015-01-05)
At Univa we hold 2014 several webinars about Univa Grid Engine and related topics. They contain lots of useful technical information also for open source Grid Engine users. The videos can be downloaded for free from the Univa homepage.
Here is a list with the links:
| Webinar | Link |
|---|---|
| Univa Grid Engine 8.2 | http://www.univa.com/resources/webinar-grid-engine-820.php |
| Upgrading to Univa Grid Engine | http://www.univa.com/resources/webinar-upgrading-to-820.php |
| Nvidia GPUs and Intel Co-processors | http://www.univa.com/resources/webinar-coprocessors.php |
| UniSight | http://www.univa.com/resources/webinar-unisight.php |
| License Orchestrator | http://www.univa.com/resources/webinar-license-orchestrator.php |
| UniCloud | http://www.univa.com/resources/webinar-unicloud.php |
| Read Only Qmaster Thread & Resource Quota Sets | http://www.univa.com/resources/webinar-rqs.php |
| CGroups | http://www.univa.com/resources/webinar-cgroups.php |
| DRMAA2 API | http://www.univa.com/resources/webinar-drmaav2.php |
| Upgrading to Univa Grid Engine | http://www.univa.com/resources/webinar-upgrading.php |
Finding all host groups in which a Grid Engine host is contained (2014-12-09)
There is no direct way in Grid Engine for getting all host groups in which one particular host is part of. But Grid Engine offers a mighty command qconf -shgrp_resolved which returns all hosts of a hostgroup (also when the hostgroup itself contains other hostgroups recursively).
Following simple shell script returns all hostgroups of which the host given as first parameter to the script is part of.
#!/bin/sh
host=$1
for hgrp in `qconf -shgrpl`; do
    for h in `qconf -shgrp_resolved $hgrp`; do
        if [ "$h" = "$host" ]; then
            echo $hgrp
        fi
    done
done
Update: Alexandru's one liner for this task is easier to setup as an simple alias (thanks for the hint).
#!/bin/bash
for aa in $(qconf -shgrpl) ; do qconf -shgrp $aa | grep -q $1 && echo $aa ; done
The Univa Grid Engine Scheduler Configuration: Why artificial load settings matters (2014-11-30)
Grid Engine's scheduler configuration is very flexible. But unfortunately flexibility often comes with interdependencies and hence increases complexity.
In this article I want to have a look at one particular feature of Grid Engine: The artificial load functionality - the job load adjustments.
What’s artificial load?
Load based scheduling is very common, administrators often want to schedule jobs to the least loaded hosts. Hence this is configured in the default scheduler configuration of Grid Engine (man sched_conf -> queue_sort_method).
But what should be considered as "load"? Usually it is the operating system load measurement (man uptime), the 5 min. load average (load_avg) divided by the number of cores (processors) on the host (= np_load_avg). In Grid Engine the load can be set in the load_formula (qconf -msconf) when load based scheduling is turned on in the queue_sort_method (set to load).
As you can see the default load comes from the compute nodes and are reported in larger intervals (configurable in the load_report_time) to the master process and hence the scheduler.
Let's assume you have 48 core machines in your cluster. Each host is allowed to run 48 single-threaded jobs in parallel. The cluster is empty.
Now users are submitting dozens of jobs - what happens in the scheduler?
The scheduler sorts the hosts (queue instances) by the load and starts to schedule the job with the highest priority to the host with the lowest load. Then it takes the second job in priority order to schedule it also the the host with the lowest load. When you look at your watch the scheduling of the second job is around a ms later hence the load situation of the hosts didn’t change (anyhow the scheduler wouldn’t get the information during a scheduling run). What now happens is that the first 48 jobs are filling up the least loaded host.
This is not optimal. In order to approach the problem the Univa Grid Engine scheduler offers an artificial load functionality. Each time the scheduler schedules a job it makes load adjustments to the selected hosts.
The amount and time the artificial load remains on the host is configurable in the job_load_adjustments and load_adjustment_decay_time (man sched_conf).
When np_load_avg=0.5 is set in job_load_adjustments then this means following: Each granted slot for a scheduled job adds an artificial load of 0.5 devided by number of processors of host to np_load_avg. This division is counterintuitive since np_load_avg is already normalized by processors. Nevertheless the bevavior the admin wants to have since the load is finally depended from the machine on which it is scheduled. On a host with 2 processors the same job adds half the load to np_load_avg than on a compute node with 1 processor.
When active the scheduling behavior is like this: Searching least loaded host, trying to accommodate the job, add job_load_adjustments to host load, search least loaded host, …. Now our 48 jobs are distributed around the least loaded hosts of the cluster - excellent!
A connected secret
Univa Grid Engine has another parameter, which is part of the queue configuration, where Grid Engine puts overloaded hosts into an alarm state (man queue_conf): load_thresholds.
When the load + artificial load exceeds the load_threshold then the scheduler will consider this queue instances as overloaded and will not scheduler any jobs to those hosts! Since all this happens in the scheduler it is not visible for you as alarm state (which is a state where a host does not accept any new jobs).
Now let’s configure a load_adjustment of np_load_avg=1 and assume having just one host with 16 slots but 8 cores. In the queue configuration set the load_threshold to 1.0.
After submitting 16 jobs you will see that only 8 jobs are placed on the host - the other jobs a staying pending (and you don’t see any host in alarm state)!
Well, the issue relaxes over time since the load adjustment finally goes away.
But this is really something to have in mind when oversubscribing hosts: Adapt the load_adjustment to your needs! Meaning when having 48 cores und single threaded short jobs you need to drastically reduce the load_adjustment (probably just setting it to 0.01) for np_load_avg. Alternatively you can increase the load_thresholds of your queues. This gives you what you want - optimal placement and usage of your cluster.
To summarize there are two key messages:
- Artificial load helps you to let the jobs be placed optimally in situations of cluster under utilization.
- When using artificial load on oversubscribed hosts, please think about your load_threshold settings in the queues depending on the amount of jobs running and the load_adjustment setting.
Try yourself! There are some nice scheduling settings possible with the load threshold. Like if you want to schedule just max. one job to certain hosts in one scheduling run. This you can activate by setting the load adjustment time decay time to a very short time (1 second) and increase the load adjustment to a very large value.
Univa Grid Engine 8.2 Released (2014-09-16)
A little bit late with my blog entry, I’m happy to announce the availability of a new major version update of Grid Engine: Univa Grid Engine 8.2
There are too many improvements to handle them all in a short blog entry like this. Also lots of changes were done under the hood: new thread pool which handles qstat / qhost request, made code compatible with Windows, etc.
The new reader thread pool leads to very good responsiveness also in busy, huge clusters. The amount of threads serving status requests can be increased up to 64 threads. This thread pool works independent from the qmaster hence it removes lots of load from it.
The Windows support is a major step for simplifying environments where besides the Linux HPC cluster also Windows hosts are integrated, for job submission, or job execution. Unlike before there is no additional Unix emulation layer required anymore. The commands are just running natively on Windows command line.
Besides these changes we introduced also lot’s of functionality which helps the admin in their daily live. Resource reservation is now completely transparent and even shown in the qstat output. Another milestone and a major differentiator to the open source Grid Engine version is the improved support for parallel jobs. Before there was no means to reliable control resource limitations for parallel jobs which are distributed unevenly (like using round robin of fill up slot allocation strategy) since different parallel jobs started up the tasks (or ranks) in different ways. Like one makes one connection to an compute node and forks then the tasks, but others creating connections for each task / rank granted on a compute node. This can now be set up in the parallel environment. Hence the user can be sure that the requested limit (like main memory limit) is always set in the same way.
There are too many other changes to cover them all: clock resolution is now everywhere in milliseconds, the maximum job id is configurable and can now be up to 4 billion, qstat / qacct show now the exact submission command line, and so on.
When it comes to integrate Univa Grid Engine in other systems, we have now support for the Cray XC30 systems, i.e. those clusters can easily be integrated in existing Univa Grid Engine clusters or upgraded with Univa Grid Engine to have superior job scheduling capabilities when managing jobs. We also include HP Insight CMU 7.2 (and higher) support with Univa Grid Engine 8.2 (was available separately before), finally we ship a beta version of a new C API for job submission, job workflow management, and cluster monitoring based on the open DRMAA2 standard.
Please check the release notes for more detailed information.
Installing a Univa Grid Engine Demo Cluster with One Command (2014-07-13)
Univa provides demo packages for Univa Grid Engine for free. The only restriction is that those packages have a built-in limitation to handle a cluster with 48 cores at maximum. But this should be sufficient to test certain functionality or try out and learn the Grid Engine cluster scheduler in general.
But when you just want to try out Grid Engine on your laptop or desktop you probably don’t want to go the way of doing an own installation, you just want a test-bed for trying Grid Engine commands out.
I played a bit with Vagrant, which is a nice tool for creating Virtual Box machines automatically and hacked a script which installs Grid Engine on 3 virtual nodes completely automatically.
Here are the prerequisites:
- Having you own laptop / desktop with MacOS X / Linux (untested) or Windows (untested) running
- Having free VirtualBox installed
- Having free Vagrant installed
- Having git version management installed (or alternative you can copy the files from my github account manually)
- Having free Grid Engine tar.gz packages (I assume here ge-8.1.5-demo-common.tar.gz and ge-8.1.5-demo-bin-lx-amd64.tar.gz which you can get here for free)
Go to command line and create a directory in your home folder and clone in a directory containing all files needed for Vagrant to do its job:
# git clone https://github.com/dgruber/vagrantGridEngine.git
or alternatively copy all files from my github account (https://github.com/dgruber/vagrantGridEngine/archive/master.zip) into an empty subdirectory.
Then copy the tar.gz from Univa (expected 8.1.5) into the same directory where Vagrantfile is.
It should look like this:
Centenario:test daniel$ ls -l
-rw-r--r--   1 daniel  staff      5724 13 Jul 13:42 Vagrantfile
-rw-------   1 daniel  staff      1610 13 Jul 14:04 authorized_keys
-rw-r--r--   1 daniel  staff      1436 13 Jul 16:40 auto_install_template
-rw-r--r--   1 daniel  staff  32097445 13 Jul 11:10 ge-8.1.5-demo-bin-lx-amd64.tar.gz
-rw-r--r--   1 daniel  staff   3332163 13 Jul 11:10 ge-8.1.5-demo-common.tar.gz
-rwxrwxr-x   1 daniel  staff      1161 13 Jul 16:44 hostnames.sh
-rw-------   1 daniel  staff      1679 13 Jul 12:28 id_rsa
-rw-r--r--   1 daniel  staff       396 13 Jul 12:28 id_rsa.pub
-rwxr-xr-x   1 daniel  staff       786 13 Jul 16:24 installation.sh
-rw-r--r--   1 daniel  staff      1970 13 Jul 16:00 known_hosts
-rw-r--r--   1 daniel  staff        74 13 Jul 12:19 start_uge.sh
If you have this, all what is required to get your Univa Grid Engine 8.1.5 demo cluster running is to perform one command in this directory:
vagrant up
This will take a while at the very first time, because it needs to download a so called „box“ (a CentOS 6.5 image ready for Vagrant) from the Vagrant repository. This needs to be done just one time.
Now all 3 virtual machines are installed in VirtualBox automatically and are going to be configured. In order to use your cluster you can do an ssh to the Grid Engine master host:
vagrant ssh master
Then you can play with Grid Engine (if Grid Engine commands are not available you need to do that first: source /vagrant/UGE/default/common/settings.sh):
qhost
qstat -f
qsub -b y sleep 123
qstat -f
qstat -j <jobid>
If you want to shut the cluster down and remove all occurrences of it then you can logout and do a
vagrant destroy
or
vagrant destroy -f
in the same directory where you called vagrant up. That’s it. If you have any problems or enhancements, please use my github repository for reporting.
Cheers
Note that the root password is vagrant. If you have different versions of Grid Engine packages just have a look in the installation.sh and adapt the package names. Be aware that the packages must be in the directory or a subdirectory.
HEPiX 2014 Slides about cgroup Integration in Univa Grid Engine (2014-06-13)
You can find my slides from the HEPiX 2014 conference about the cgroup integration in Univa Grid Engine here.
Client Side JSV Performance Comparison - And the Winner is: Go (#golang) ;-) (2014-03-15)
With JSV scripts you can verify and change your job submission parameters. Depending on the called functions you can also reject jobs which does not follow rules you specify in the script. Those JSV scripts can be installed globally on the qmaster (qconf -mconf / jsv_url parameter) or can be specified during job submission time with -jsv (client side jsv). With recent performance improvements when processing client side JSV scripts in UGE 8.1.7 it makes now sense to compare different scripting languages in which JSV scripts can be written.
With Sun Grid Engine or older Univa Grid Engine versions client side JSV script were slow, which was an issue when submitting massive amount of jobs in scripts. Now, depending on the scripting language the complete job submission time – including JSV processing within qsub - can go down to 38ms.
Because the Go programming language is fast and elegant I implemented the JSV protocol in a Go library, which I put under an open source license on my github account. You can get it from:
https://github.com/dgruber/jsv
Traditionally Grid Engine supports Java, TCL, Perl, and bash.
In order to compare the job submission time performance with a client side JSV I created a very basic script in Go, TCL, Perl and bash. Then I submitted jobs multiple times and measured the time with the “time” command line tool.
Following boxplots are showing the results. Not surprisingly Go (#golang) offers by far the fastest job submission performance (down to 38ms), while TCL and Perl are still good in performance. Bash is very slow but still can be used when not doing mass-submits.
NOTE: Without using JSV a qsub is still many times faster (down to 12ms in my VM). Using a multi-threaded submit tool based on DRMAA API (see an article here in my blog about Go DRMAA) I got an average per job submission time of 1-2ms.

The scripts are adding the core binding parameter for a job (-binding linear:1). Below you can find the JSV scripts which I used for testing submission performance. All jobs where submitted with:
qsub -b y -jsv ./<script> sleep 123
How to configure different prolog scripts for different hosts or host groups (2014-03-03)
When configuring Grid Engine a good tuning point is always to reduce the amount of queues (i.e. queue instances). When having a need for different machine type specific prolog and epilog scripts (for different heath-check for example) this does not require to configure multiple queues containing different prolog and epilog scripts. Instead you can configure them in the same queue using the bracket notation where you can define settings for queue instances (a queue setting for a host) and queue domains (a queue setting for a hostgroup).
Here is an example of how to configure different prolog scripts for different host groups
I‘ve configured two additional host groups: @centos and @suse11 for which I want to have different prolog scripts running before a job is started.
daniel@mint14:~$ qconf -shgrpl
@allhosts
@centos
@suse11
My prolog scripts just printing out something on stdout.
daniel@mint14:~$ cat /nfs/prolog_cent.sh
#!/bin/sh
echo "I'm a CentOS box"
daniel@mint14:~$ cat /nfs/prolog_suse.sh
#!/bin/sh
echo "I'm a SUSE box"
Now we can add those two prolog scripts in the prolog configuration of one queue. Here for the host-group @centos the /nfs/prolog_cent.sh script is set. The prolog for host-group @suse11 is set respectively(of course you can also just use an host name instead of a hostgroup).
daniel@mint14:~$ qconf -mattr queue prolog "NONE,[@centos=/nfs/prolog_cent.sh],[@suse11=/nfs/prolog_suse.sh]" all.q
daniel@mint14 modified "all.q" in cluster queue list
Now verify that the queue configuration was set in the right way.
daniel@mint14:~$ qconf -sq all.q | grep prolog
prolog                NONE,[@centos=/nfs prolog_cent.sh], \
                  [@suse11=/nfs/prolog_suse.sh]
Finally we submit two jobs to two different hostgroups (i.e. here queue domains since the job is required to run in all.q).
daniel@mint14:~$ qsub -b y -q all.q@@suse11 /bin/sleep 0
Your job 8 ("sleep") has been submitted

daniel@mint14:~$ qsub -b y -q all.q@@centos /bin/sleep 0
Your job 9 ("sleep") has been submitted
Now check the job output file. It must contain the prolog output.
daniel@mint14:~$ cat /home/daniel/sleep.o9
I'm a CentOS box
daniel@mint14:~$ cat /home/daniel/sleep.o8
I'm a SUSE box
Main Memory Limitation with Grid Engine - A short Introduction into cgroups
One of my current projects is implementing cgroups in Univa Grid Engine. It will be available in the next releases (Univa Grid Engine 8.1.7 or 8.2). Control groups are a Linux kernel enhancement which provides some nice features for better resource management. Hence cgroups features can only be used on 64 bit Linux hosts (lx-amd64). This article is a short introduction into one of the supported features for Univa Grid Engine: main memory limitation for jobs.
The cgroups subsystems can be enabled in Grid Engine either on cluster global level or on host local level (for heterogenous clusters) in the host configuration. The current configuration is opened with qconf -mconf global or qconf -mconf <host-name>. You will note following new configuration parameter list:
> qconf -mconf global
 ...
 cgroups_params               cgroup_path=none cpuset=false mount=false \
                              freezer=false killing=false forced_numa=false \
                              h_vmem_limit=false m_mem_free_hard=false \
                              m_mem_free_soft=false min_m_mem_free=0
For enabling cgroups the cgroups_path must be set to the path on which the cgroups subsystems are mounted. On RHEL 6 hosts the default is /cgroup but /sys/fs/cgroup is also a frequently used directory. In order to enable specific subsystems or control their behavior the remaining configuration parameters in the Grid Engine host configuration have to be activated.
There are two ways to restrict main memory for a job:
hard limitation: All processes of the job combined are limited from the Linux kernel that they are able to use only the requested amount of memory. Further
malloc()calls will fail.soft limitation: The job can also use more memory if it is free on the host - but if the kernel runs out of memory because of other processes, the job is pushed back to the given limits (meaning that the memory overflow is swapped out to disk).
Hard memory limitation is turned on by setting the parameter m_mem_free_hard=true (soft limitation is activated respectively). That's it from the Grid Engine configuration point of view! Now when a job requests main memory with m_mem_free and the job is scheduled to an host with such a configuration, a cgroup in the memory subsystem is created automatically and the job is put in. The limit can be used for batch jobs, parallel jobs and interactive jobs. For parallel jobs the limit is set to the requested amount of memory multiplied by the granted slots for the jobs as expected.
Following example demonstrates a job which behaves well, meaning using less memory than requested hence the job remains unaffected by the limit. (Btw. memhog is a utility which requests a given amount of memory and frees it (repeatedly).)
> qsub -l h=plantation,m_mem_free=1G -b y memhog -r100 990m
Your job 4 ("memhog") has been submitted

> qacct -j 4
 ==============================================================
 qname        all.q
 hostname     plantation
 ...
 jobname      memhog
 jobnumber    4
 ...
 qsub_time    Sun Aug 25 11:39:20 2013
 start_time   Sun Aug 25 11:39:26 2013
 end_time     Sun Aug 25 11:39:50 2013
 ...
 slots        1
 failed       0
 exit_status  0
 ru_wallclock 24
 ru_utime     22.822
 ru_stime     0.411
 ru_maxrss    1014384
 ...
 maxvmem      1015.188M
 ...
In the next example the job is aborted immediately because it used more main memory than requested:
> qsub -l h=plantation,m_mem_free=1G -b y memhog -r100 1050m
Your job 5 ("memhog") has been submitted

> qacct -j 5
==============================================================
qname        all.q
hostname     plantation
...
jobname      memhog
jobnumber    5
qsub_time    Sun Aug 25 11:41:53 2013
start_time   Sun Aug 25 11:41:56 2013
end_time     Sun Aug 25 11:41:57 2013
...
slots        1
failed       0
exit_status  137
ru_wallclock 1
ru_utime     0.504
ru_stime     0.315
ru_maxrss    1048452
...
maxvmem      1.050G
…
And finally an interactive session is showed. The interesting part here is that the interactive session as such is not aborted, only the command started by the interactive session is aborted due to the lack of memory.
> qrsh -l h=plantation,m_mem_free=1G
daniel@plantation:~> memhog -r4 1000m
....................................................................................................
....................................................................................................
....................................................................................................
....................................................................................................
daniel@plantation:~> memhog -r4 1050m
.......................................................................................................Killed
daniel@plantation:~> memhog -r4 1024m
.......................................................................................................Killed
daniel@plantation:~> memhog -r4 1023m
.......................................................................................................Killed
daniel@plantation:~> memhog -r4 1020m
......................................................................................................
......................................................................................................
......................................................................................................
......................................................................................................
daniel@plantation:~> exit
logout
>
There are two additional settings you should know about. Since the Grid Engine process which takes care about starting and tracking your application (sge_shepherd) is also part of the job and accounted in the memory it could produce additional overhead to the memory footprint of your job. Additionally it should be prevented that the user sets realistic low limits for the jobs. Both issues are addressed with the min_m_mem_free limit parameter. If you configure it to let's say 250M, each job gets at least a limit of 250M even the job requested only 10M. Nevertheless for job accounting with qstat or qacct only the job requests are considered. The second setting is the mount=true setting. If turned on the memory subsystem is tried to be mounted automatically by Univa Grid Engine if not already available under <cgroups_path>/memory. On a properly configured host this should be done already during system boot time but setting this parameter prevents from failures (or just simplifies things in some cases).
The other cgroups subsystems used by the upcoming Univa Grid Engine versions I will discuss in one of the next blog entries.
Tracing execd -> qmaster protocol with qping (2013-09-23)
Sometimes it is useful to display the communcation between two Grid Engine daemons. For example when load sensor values are not visable in qstat (or wrong values appear).
In order to print out a protocol trace you can connect to the execd with the qping tool, which is shipped with Grid Engine.
First you need to switch to the root account on the execd. Then you have to enable full reporting for qping by setting a specific environment variable:
export SGE_QPING_OUTPUT_FORMAT="s:12 s:13"
This enables columns 12 and 13. See qping -help for more information.
Then you can connect to the execd with following command:
qping -dump_tag ALL INFO myhostname $SGE_EXECD_PORT execd 1
Don't forget to source all Grid Engine environment variables (e.g source $SGE_ROOT/default/common/settings.sh, where $SGE_ROOT is the path to your installation) beforehand.
You will get an output like following when qping is executed:
open connection to "u1010/execd/1" ... no error happened
…
List: <report list> * #Elements: 2
REP_type             (Ulong)     = 1
REP_host             (Host)      = u1010
REP_list             (List)      = full {

List: <No list name specified> * #Elements: 8
-------------------------------
LR_name              (String)    = load_long
LR_value             (String)    = 0.070000
LR_global            (Ulong)     = 0
LR_static            (Ulong)     = 0
LR_host              (Host)      = u1010
-------------------------------
LR_name              (String)    = mem_free
LR_value             (String)    = 388.816406M
LR_global            (Ulong)     = 0
LR_static            (Ulong)     = 0
LR_host              (Host)      = u1010
-------------------------------
LR_name              (String)    = virtual_free
LR_value             (String)    = 779.726562M
LR_global            (Ulong)     = 0
LR_static            (Ulong)     = 0
LR_host              (Host)      = u1010
-------------------------------
LR_name              (String)    = mem_used
LR_value             (String)    = 103.550781M
LR_global            (Ulong)     = 0
LR_static            (Ulong)     = 0
LR_host              (Host)      = u1010
-------------------------------
LR_name              (String)    = virtual_used
LR_value             (String)    = 110.636719M
LR_global            (Ulong)     = 0
LR_static            (Ulong)     = 0
LR_host              (Host)      = u1010
-------------------------------
LR_name              (String)    = m_mem_used
LR_value             (String)    = 101.000000M
LR_global            (Ulong)     = 0
LR_static            (Ulong)     = 0
LR_host              (Host)      = u1010
-------------------------------
LR_name              (String)    = m_mem_free
LR_value             (String)    = 391.000000M
LR_global            (Ulong)     = 0
LR_static            (Ulong)     = 0
LR_host              (Host)      = u1010
-------------------------------
…
After a while you can see a similar output which is more or less self describing. You can see the reosurce name the values, the host where they come from, and some tags (if it is a cluster global value or a static complex).
Suspend and Resume Parallel Jobs in Grid Engine (2013-07-31)
Tightly integrated parallel jobs are under full control of Grid Engine (accounting/resource limitation/etc.). But what happens when a tightly integrated parallel job is suspended?
The default signal sent to jobs for suspension is SIGSTOP and for resuming SIGCONT. Because SIGSTOP can't be catched in order to react (like forwarding suspension to clients) Grid Engine can send a catchable notifcation signal a few seconds in advance (config value notify in the queue config) when the job was submitted with -notfiy (man page qsub). This is not always a good solution since it delays suspension. Another solution is to configure a different signal for suspension like SIGTSTP. The signal or even a script can be configured in the queue configuration (suspend_method). But who gets the signals? This depends on the host configuration. There is a execution daemon parameter called SUSPEND_PE_TASKS (see man sge_conf). If the parameter is set to false only the master task gets the signal, the slave tasks are expected to be suspended from the master task of the job itself. If set to true then all parallel tasks of the job are signalled in arbitrary order. The default of SUSPEND_PE_TASKS (when not configured) changed some years ago from false to true hence it is better to configure it in the host or global configuration (qconf -mconf global) when using suspension / resume with parallel jobs. A good candidate to move into job classes.
Univa Grid Engine 8.1.5 and License Orchestrator 1.0.0 released (2013-07-25)
Since today the next milestone of Grid Engine - UGE 8.1.5 is officially available. It not just contains over 40 important fixes, it is also the first version with built-in support for our new product the Univa License Orchestrator. At the same time we released Univa License Orchestrator 1.0.0. The License Orchestrator can not only manage licenses beyond multiple Grid Engine installations or even when used outside of Grid Engine, it also comes with an interconnection to Flexera, and a broad range of features for license management like fair shares for licenses, license quotas for restricting specific users / groups, external tools (losub) for requesting licenses outside of Grid Engine, accounting and reporting of license usage, a tight integration into UniSight (our web based reporting tool which is shipped with Univa Grid Engine), and reservation of licenses. The integration in UGE 8.1.5 is handled by a special thread called lo_thread which needs to be enabled by qconf -at lo_thread after setting the lo_root qmaster parameter pointing to the license orchestrator installation.
When it comes to improvements then several fixes for qrsh can be mentioned (performance and reliability), advance reservations can now also handle longer durations (a date overflow bug was fixed), the scheduler sorting algorithm got updates and does now a efficient binary search per default (when using slot ranges), on MacOS X launchd support is now enabled as default. We also introduced a new qmaster parameter (ENABLE_REDUCE_MEM_FREE) which allows you to enable that memory requests (mem_free) can be reduced during job runtime with qalter.
With UGE 8.1.5 you can now also specify an estimated runtime for a job without letting the job be signaled when the time is over. Using h_rt (hard runtime limit) and s_rt (soft runtime limit) usually leads to abortion of the job. The signal sent by s_rt can be caught by the job but for this the job needs to be either started by a wrapper script or the job itself must install a signal handler. With the new d_rt no signal is sent which does not required any changes for the job and therefore simplifies setup. Why providing a runtime when it has no effects? Giving the expected runtime is a requirement for resource reservation for example. Setting a global default runtime for the jobs (which also can be configured) is usually not very helpful for the scheduler in that case. Before you can use d_rt you need to initialize d_rt=INFINITY in the global host (qconf -me global -> complex_values d_rt=INFINITY).
Note that 8.1.5 requires a clone upgrade when coming from earlier releases.
More information (the complete issue list) you will find here here.
Univa Grid Engine 8.1.4 Released (2013-03-20)
Some weeks ago we released the Univa Grid Engine (UGE) 8.0.1p16 maintenance release for our 8.0.1 users and today we are happy to ship the next version of our 8.1 branch: 8.1.4. Overall it has about 50 more issues solved since 8.1.3.
As usual it comes with fixes and smaller enhancements. In particular our Intel Xeon Phi support was updated. The documentation contains now detailed example scripts about how to start MIC native binaries directly on the Intel Xeon Phi boards. An additional helper tool (mic_load_check) which outputs load values of the co-processor board is shipped as well. It shares the same code base as our Intel Xeon Phi load sensor, which was introduced in UGE 8.1.3. The loadcheck utility (located in /utilbin/
Several improvements for memory management also did it into this release. It is now possible to lower the m_mem_free memory a job got granted by UGE during job run-time with qalter -l m_mem_free. In NUMA system it automatically adapts also the free memory on a particular NUMA node (m_mem_free_n
Performance enhancements were also implemented: Qmaster sometimes moved too many jobs from one scheduling round to the next under some circumstances. This was improved so that the overall cluster utilization could be higher especially in bigger clusters. The scheduler is now able to stop the scheduling run after a pre-configured time limit is reached within the scheduling loop or after a specific amount of jobs could be dispatched. This can be enabled by the new scheduler parameters MAX_SCHEDULING_TIME and MAX_DISPATCHED_JOBS.
For the other issues handled within this release please have a look at the list of fixes in the release notes.
Fun With Grid Engine Topology Masks -or- How to Bind Compute Jobs to Different Amount of Cores Depending where the Jobs Run (2013-01-09)
A compute cluster or grid often varies in the hardware installed. Some compute
nodes offers processors with strong compute capabilities while others are
older and slower. This becomes an issue when parallel compute jobs are
submitted to a job/cluster scheduler. When the jobs runs on slower
hardware it should use more compute cores than on faster cores. But during
submission time the parameters (like the amount of cores used for core
binding) are often fixed. An obvious solution is to restrict the scheduler
that the job can only run on a specific cluster partition with similar
hardware (like in Grid Engine a queue domain requested with -q
queue@@hostgroup). But the drawback of this approach is that the
cluster is not fully utilized while jobs are waiting for getting a fast
machine.
An alternative would be to exploit the new Grid Engine topology masks
introduced in Univa Grid Engine 8.1.3. While with the core binding
submission parameter (qsub -binding) a job requests a specific fixed
amount of cores for the job, the topology mask bind the core
selection request to the resource (i.e. execution machine the scheduler selects). Hence the Grid Engine scheduler can translate a virtual entity into the machine
specific meanings. That‘s a bit abstract, hence an example should
demonstrate it:
We assume that we have two types of machines in our cluster, old two
socket quad-core processors and new octo-core machines also with two
sockets. The workload creates lots of threads or can create as much
threads as processors are available (during job execution the processors
can be get from the $SGE_BINDING environment variable). What we can do now
is defining a virtual compute entity, which expresses some compute power.
Let‘s call it quads here. Since the old compute cores are slower than the
new one you can define that a quad for the old machines are all four cores
of processor, while on the new host a quad is equivalent to two cores (or
one core if you like).
All what you have to do is to define the new compute entity quad in the Grid
Engine complex configuration as a per host consumable with type
RSMAP (resource map).
       qconf -mc

        quad  qd  RSMAP  <=  YES  HOST  0  0
Now we need to assign the quads to the hosts. This is done in the host configuration. At an old host a quad represents 4 cores. Hence 2 quads are available per host.
       qconf -me oldhost

       complex_values quad=2(quad1:SCCCCScccc quad2:SccccSCCCC)
Now we have two quad resources available: quad1 which is bound to the 4
cores on the first socket and quad2 which is available on the 4 cores of
the second socket.
The same needs to be done on the new hosts, but now a quad are just two CPU
cores.
       qconf -me newhost


       complex_values quad=8(quad1:SCCccccccScccccccc quad2:SccCCccccScccccccc \

      quad3:SccccCCccScccccccc quad4:SccccccCCScccccccc \

      quad5:SccccccccSCCcccccc quad6:SccccccccSccCCcccc \

      quad7:SccccccccSccccCCcc quad8:SccccccccSccccccCC)
This looks like a little work for the administrator but afterwards it is
very simple to use. The user just has to request the amount of quads he
wants for the job and finally the core selection and core binding for the job is automatically done. The scheduler selects always the first free quad in the order of the complex values definition. Following job
submission demonstrates it:
qsub -l quad=1 -pe mytestpe 4 -b y sleep 123

In order to force all jobs to use this compute entity quad, a JSV
script could be written which adds the request to all jobs
(while it disallows any existing core binding requests).
When now the job runs on a new host it is bound on two cores, while when
the job is scheduled by Grid Engine to an on old host it runs on four
cores. Of course you can also request as many quads as you like. NB: When
requesting more then 2 quads per job, the job can‘t be scheduled to an old
host. It will run only on new hosts. The quads are a per host requests,
meaning that on each host the job runs that amount of quads you had
requested are chosen (independent from the requested and granted amount of
slots on this host).
This feature is unique in Univa
Grid Engine and was introduced in UGE 8.1.3.
Univa Grid Engine 8.1.3 - Faster and Several New Features (2012-11-20)
Version 8.1.3 of Grid Engine is out! It comes with some performance improvements in the scheduler, some new features, and of course bug fixes. The most important thing first: The scheduler is now in certain situations, namely in big and busy clusters (with more than just a hundred of compute nodes) having lots of exclusive jobs much faster. In (artificial) test-scenarios with 2000 simulated hosts and 3000 jobs a scheduling run went down by a factor of 10-20. In real-world scenarios the performance gain still could be highly visible.
The new features includes direct support of Intel Xeon Phi and general features related for making optimal use of such co-processing devices in a Grid Engine managed environment. There is a text UI installer, where you can select the resources (like different temperatures, power consumption in watt etc), which should be reported by the hosts the devices are installed on. Of course a configurable load sensor reporting these metrics is not missing. The generic Grid Engine enhancements cover resource map topology masks and per host consumables.
Automatic Resource Based Core Binding
Since UGE 8.1 the new RSMAP consumable type is available in Univa Grid Engine. A RSMAP or resource map is the same like an integer consumable (where the number of a resource type can be controlled), but offers additional functionality. Each instance of a resource has an ID (like a simple number) which gets attached to the job.
Example: When having 4 Phi cards on a host not only the amount (like in Sun Grid Engine 6.2u5) can be managed, each Phi can be assigned a special ID in the complex_values field of the host. Hence complex_values phi=4(oahu-mic0 oahu-mic1 oahu-mic2 oahu-mic3) assigns the phi complex 4 different ids: oahu-mic0 to oahu-mic3 (qconf -me oahu opens the host configuration for doing that). When submitting a job with qsub -l phi=1 the scheduler assigns a free RSMAP id to the job. The job can get the decision by reading out the SGE_HGR_phi environment variable (SGE_HGR_<complexname>, HGR means hard granted resource). Finally the job can start the Phi binary by ssh $SGE_HGR_phi <phi_programm> (the Phi device runs a small Linux having its own network address and is named usually <hostname>-mic<micno>). The qstat -j output shows the device the job gets assigned by the scheduler.
When it comes to hybrid jobs often communication happens between the part of the job running on the host and the part of the job running on the Phi device. Hence the host-part should run on that cores of the NUMA host which are near to the selected Phi device. This can now be configured by the administrator in a very easy and flexible way. The only thing what needs to be done is attaching a topology mask to the resource ids in the host configuration. An additional requirement is that the RSMAP is configured as a per host consumable in the complex configuration (qconf -mc), but more about this in the next section.
Topology masks are configured in the complex_values field of the host configuration where the consumable was initialized. In the example below we have 4 Intel Xeon Phi devices on the host oahu. The first two are near to the first socket the remaining two are near to the second socket. This information can be found in the mic subdirectory of the sys filesystem. The configuration is made available for Univa Grid Engine 8.1.3 in the following way:
qconf -me oahu
   complex_values phi=4(mic0:SCCCCccccScccccccc mic1:SccccCCCCScccccccc \
   mic2:SccccccccSCCCCcccc mic3:SccccccccSccccCCCC)
Here you can see that 4 resources of the type phi (which must exist in the complex configuration qconf -mc) are configured. The IDs are mic0 to mic3. For mic0 the first 4 cores of the first socket are available. A upper C means that this core can be used, while a lower c means that this core in not available for a job which gets mic0 granted. The topology string must be appended to the ID by a colon. Another requirement to get this work is that RSMAP is defined as a per HOST consumable (see below). So when submitting a job requesting -l phi=1 it and it gets mic0 granted, the job is automatically bound to the first 4 cores on the first socket, the second job on the remaining 4 cores on the first socket and so on (without a need that the qsub has to specify anything other then the phi resource with -l phi=1). When you are adding additionally on the command line a core binding request then the scheduler only selects cores from the allowed (by this topology mask) subset. Hence when more cores are requested than granted by the topology mask, the job will not start on this host. If just one core is requested (like qsub -binding linear:1 -l phi=1 ...) then the job is bound to only one core, which must be one of the cores allowed by the topology mask. Of course more phis can be requested, hence when doing a qsub -l phi=2 ..., the job is bound to the 8 cores available for the 2 phi cards.
Per Host Consumable Complexes
The RSMAP complex type offers since version 8.1.3 support for a new value in the consumable field of the complex configuration (qconf -mc): HOST. This is the first consumable type in Grid Engine which offers a per host resource request out of the box.
The consumable column usually can be set to NO which means that the complex is not a consumable. This is needed for host or queue specific properties, a RSMAP can‘t be set to NO because must be always a consumable. Setting the consumable column to YES means that this complex is always accounted. I.e. depending where you initialize the value of the complex (the amount of resources it represents) in the queue configuration (qconf -mq <q> ... complex_values...) or in the host configuration (qconf -me <hostname/global> ... complex_values ...) the amount is reduced by each job by the amount of slots the job uses in the particular container. For example when you have a parallel job spanning 2 hosts, where on host 1 the job gots 4 slots and on host 2 it got 2 slots, the host 1 resource is reduced by 4 and host 2 is reduced by 2 when you‘d requested 1 of the particular resource for the job (qsub -l resource=1 -pe roundrobin 6 ...). When the consumable column is set to JOB then the amount of requested resources (in this case 1) is just reduced on the host where the master task runs.
With new HOST consumable type the amount of requested resources is decremented on all hosts where the job runs independent of the amount of slots the job got granted. In the example the resource will be decremented by one on host 1 and host 2. This is useful for co-processor devices like Intel Xeon Phi or other devices like GPUs, where you want to specify how many of the co-processors should be used on each host.
Better SMT support in Univa Grid Engine 8.1.2 (2012-10-11)
The current release of Univa‘s Grid Engine 8.1.2 is not only further improving stability, it also has a small enhancement for a better support of heterogenous clusters having hyper-threaded and non hyper-threaded hosts (this enhacement is available since 8.1.1). This request originally came from a larger research institute, which is exploiting Univa Grid Engine‘s core binding feature.
The situation was following: The jobs should always be bound to cores depending on the amount of slots the job requests. This can easily be solved by adding -binding linear:<n> where <n> denotes the number of slots requested per host. But some of the hosts had hyper-threading enabled while others not and the jobs are allowed to run on both host-types. Their parallel jobs had 2 threads running on a hyper-threaded core while on non hyper-threaded machines only one thread per core was allowed.
Hence a new scheduler parameter was introduced: COUNT_CORES_AS_THREADS
It can be set globally by opening the scheduler configuration with qconf -msconf, and append the parameter to the params field (like params COUNT_CORES_AS_THREADS=1).
What the scheduler now does (when it is enabled) is following: On all hosts it requests just as many cores needed to have <n> processing units (or hardware threads) bound to the job. So the core count request is transformed on each host to a thread count request.
Following example demonstrates this:
qsub -b y -binding linear:4 sleep 123
The scheduler will allow this job to run on hyper-threaded host, when it has 2 cores (and 4 threads) unbound. On a non-hyperthreaded host, the job will need 4 cores and therefore is dispatched by the scheduler, when such a host offers 4 unbound cores.
Grid Engine Complex Configuration: The thing with FORCED resources (2012-09-20)
Due to the tremendous amount of configuration options in Grid Engine one complex configuration parameter is often overlooked: FORCED complexes.
Grid Engine handles resources in the complex configuration where each complex represents a resource. When the configuration is opened with qconf -mc, different columns are displayed for each resource. There is a name and a shortcut (both can be used for requesting this resource) as well as if it is a consumable (YES, NO, JOB) and so on. A resource can also be requestable: YES, which is for self-defined complexes most likely the default case. But additionally you can also set a resource to be FORCED requestable.
What this means is following: Wherever you initialize a complex (on queue level, queue instance level, host level, or global level) in the complex_values field with such a FORCED resource, those entities are not just selected by the scheduler for being valid ones, those entities allow only jobs with such resource requests to run. In other words: Jobs which are not requesting this forced complex are no able to run on such hosts or queue instances (wherever you initialized to complex).
Following example demonstrates the use of a FORCED complex:
Let‘s say you have different users, some are using core binding, some not (yes, I love this topic ;). You can argue that it could lead to an unfair situation on hosts where jobs are pinned to cores while others (bad jobs which create more processes than slots they got granted by the scheduler) are allowed to run on all cores. Such a situation can be relaxed in the following way: Create a complex "bound_job" which is just a BOOL (non-consumable). But this complex has to be set to FORCED in the "requestable" column (not to YES). Then set this "bound_job=1" resource to some hosts of your cluster (qconf -me -> complex_values or qconf -aattr exechost complex_values bound_job=1 <hostname>), which should be used exclusively for core bound jobs. When a user wants to submit a job with core binding he only has to add -l bound_job=1 additionally to the core binding request of the job. (If you don‘t trust the users, you can also create a JSV script doing this exclusively for jobs requesting core binding.)
What you get is following: Only jobs with core binding are now running on the hosts which have bound_job=true in the complex_values configuration (qconf -me <hostname>). Jobs without requesting core binding (i.e. without the bound_job request) are not allowed to run on those hosts. If you want to let core bound jobs also run on shared hosts, you only need to add a -soft in front of the -l bound_job=1 request.
Boosting OpenMPI Performance with Rankfiles, OpenMP, Core Binding and Univa Grid Engine (2012-08-10)
This article describes exploiting a per-rank binding when using a "rankfile" with OpenMPI jobs and hybrid jobs using OpenMP in Univa Grid Engine 8.1
That compute jobs can improve performance when operating scheduling for the job is turned off and the processes are bound to a fixed set of processors is not new. In Sun Grid Engine 6.2u5 we therefore built-in a core binding feature, which allows to pin jobs to specific processors. This feature evolved over time and is since UGE 8.1 a part of the Grid Engine scheduler component itself.
Levels of CPU Affinity
When compute jobs are bound to processors the complete UGE job is bound per default to the selected set of CPU cores. Hence when you have a four way parallel job with four threads and they are bound to four CPU cores by Grid Engine, the threads itself can still change the cores within the subset of cores selected. What you basically have at this stage is a course grained per job binding. The following picture illustrates this situation: On a two socket execution host the job is bound to the first core on the first socket as well as to the first core on the second socket. When the application has two processes both are allowed to run on both cores. Hence the processes can change the sockets. In this example the job submission was done by using the „-binding striding:2:4“ qsub option (i.e. on each host the job is running it is bound on two cores with a distance of four).
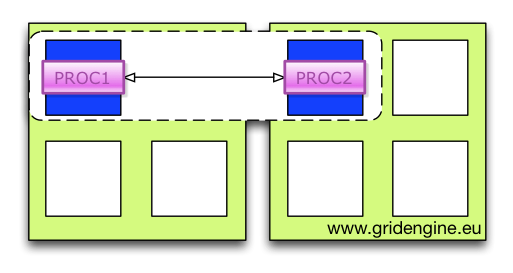
The next level of binding is a per process binding. Since Grid Engine knows nothing about the job (how many processes or threads are created finally) during submission and scheduling time, this binding is usually done by a parallel run-time system, like OpenMPI.
So how can OpenMPI interact with Grid Engine? In Univa Grid Engine 8.1 the scheduler knows everything about the host topologies and the CPU cores which are used by other jobs hence UGE does a good job in pre-selecting the cores for a per job, depending on other jobs running in the system, without doing the actual binding itself. This can be done by using the "-binding pe" qsub submission parameter. The selected cores are then made available in the "pe_hostfile" as well as in teh SGE_BINDING environment variable. The provided information can be exploited by the run-time system of the job. OpenMPI supports this by a so called „rankfile“ which can be passed to the mpirun command. It contains a mapping of a single MPI rank to a specific core on a specific socket. Univa Grid Engine can generate such a rankfile by adding a conversion script to the parallel environment.
An example template with a pre-configured conversion script is part of the Univa Grid Engine 8.1 distribution. The template as well a the shell script and a README can be found in the $SGE_ROOT/mpi/openmpi_rankfile directory. All what you have todo is adding the template into Grid Engine and adding the newly generated openmpi_rankfile parallel environment to your queue configuration.
> qconf -Ap $SGE_ROOT/mpi/openmpi_rankfile/openmpi_rankfile.template
> qconf -mq all.q <-- adding the PE in the queue configuration
If you want to adapt your parallel environment yourself, all what you have to do is to add the path to a conversion script, which parses the pe_hostfile for the selected cores (fourth column in format <socket>,<core>:...) and does a mapping between cores and ranks. Then the rankfile must be written into $TMPDIR/pe_rankfile.
In order to pass the generated information to OpenMPI, mpirun must contain the option „--rankfile $TMPDIR/pe_rankfile“. In order to submit the parallel program you have to call
> qsub -pe openmpi_rankfile 4 -binding pe striding:2:4 -l m_topology=“SCCCCSCCCC*“ yourmpiscript.sh
This selects two socket four core machines for the job (m_topology) and requests two cores on each machine (with a step-size of four) for binding (striding:2:4), and four slots in total. Hence the job will run on two machines since the allocation rule of the parallel environment is two (i.e. two slots on each host). 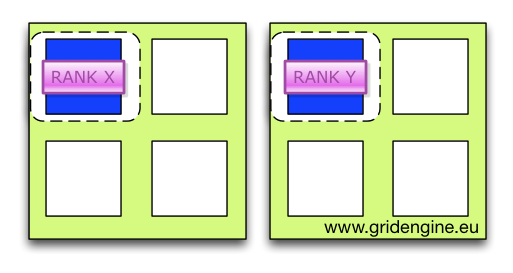
Since two slots for a machine are chosen as well as two cores the conversion script assigns each rank a different core. Now each rank will be bound to a different core. This can be tested with the taskset -pc <pid> command. It shows for the process given by <pid> the core affinity mask.
But this is not the end of the story. Each MPI rank could contain parallel code like OpenMP statements itself and therefore it is needed that one rank needs two have more cores like shown in the next illustration.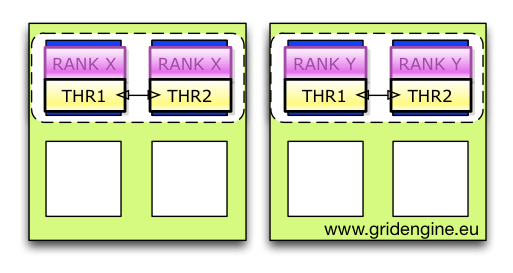
Here each rank got two cores from the rankfile (for this situation the program/script must be slightly adapted) and two ranks are placed on one machine. Each rank / or process can contain multiple threads and there is a need to bind each of the threads to its own core. After applying the rankfile binding now the more fine grained per thread binding must be performed (based on UGE selected cores).
In the following example OpenMP is used for thread parallel processing within each rank. The gcc OpenMP implementation is using the GOMP_CPU_AFFINITY environment variable in order to bind threads on cores. The environment variable contains a list of processor IDs which are chosen by the run-time system for thread binding. Fortunately all forms of core binding (pe, env, set) provided by Univa Grid Engine 8.1 are setting the SGE_BINDING environment variable which contains a space separated list of the selected logical CPU cores as processor IDs. But when having two ranks per host it contains all cores selected for the host as available for the job. Hence the full list must be converted so that each rank just gets a subset of them. This must be done in the OpenMPI job script (which is called by mpirun) itself since it needs the information about the specific rank number chosen. This information (i.e. the rank number itself) is used to split the processor list into two parts (even rank numbers get the first two cores uneven ones the remaining two cores on a host). The following shell code sets the GOMP_CPU_AFFINITY for each rank.
#!/bin/bash
# set path to openmpi lib
export LD_LIBRARY_PATH=/usr/local/lib
export PATH=$PATH:/usr/local/bin
# expecting 2 ranks per host and 4 cores selected, first one gets first 2 cores
if [ $(expr $OMPI_COMM_WORLD_RANK % 2) = 0 ]; then
export GOMP_CPU_AFFINITY=`echo $SGE_BINDING | tr " " "\n" | head -n 2 | tr "\n" " "`
echo "Rank $OMPI_COMM_WORLD_RANK got cores $GOMP_CPU_AFFINITY"
else
export GOMP_CPU_AFFINITY=`echo $SGE_BINDING | tr " " "\n" | tail -n 2 | tr "\n" " "`
echo "Rank $OMPI_COMM_WORLD_RANK got cores $GOMP_CPU_AFFINITY"
fi
# start the OpenMPI programm
/home/daniel/scripts/a.out
This script is started by following job script.
#!/bin/sh
# show hostfile and rankfile for debugging purposes
echo "pe_hostfile"
cat $PE_HOSTFILE
echo "pe_rankfile created by create_rankfile.sh scripts configured in GE parallel environment"
cat $TMPDIR/pe_rankfile
echo "SGE_BINDING is $SGE_BINDING"
mpirun --rankfile $TMPDIR/pe_rankfile /home/daniel/scripts/openmpi_hybrid.sh
Finally the binding looks like in the next picture.
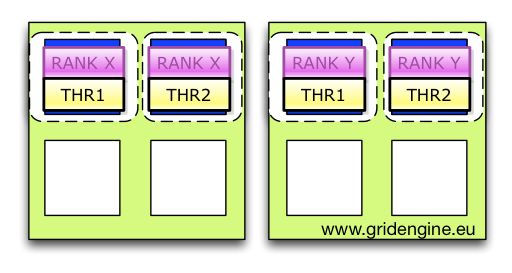
If you have one rank per host but multiple OpenMP threads per rank it is much easier. The only thing you have to do is to set OpenMP environment variable to the adapted content of the SGE_BINDING variable in the mpirun script.
export GOMP_CPU_AFFINITY=`echo $SGE_BINDING`
echo "GOMP_CPU_AFFINITY is set to $GOMP_CPU_AFFINITY"
In order to squeeze out some additional percentages of performance a job can be forced to take only directly connected memory (and not going over the quick-path interconnect through other sockets to memory with a higher latency). This is done by adding the new "-mbind cores:strict" parameter in Univa Grid Engine 8.1 during job submission.
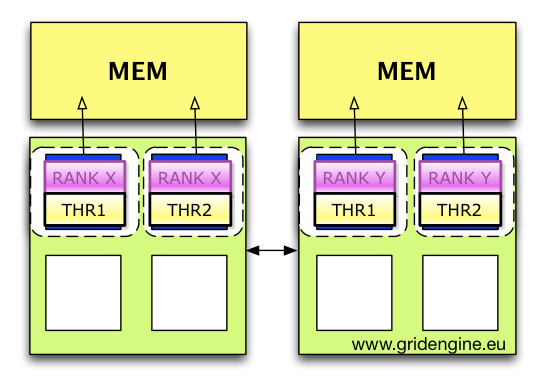
UPDATE: 09/05/2012
While playing with a new "toy" ;-) I figured out that the GOMP_THREAD_AFFINITY settings above does not work correctly on all system types. GOMP_THREAD_AFFINITY accepts CPU ids while SGE_BINDING reports logical core numbers. This must be taken into account when having a Intel box with hyper-threading activated. Hence the SGE_BINDING core number must be first converted into the OS CPU number. This can be done by the Grid Engine "$SGE_ROOT/utilbin/lx-amd64/loadcheck -cb" command. It puts out all conversion needed. Since it takes a short moment to run the mapping can be also stored in the filesystem.
Here is the output for a hyper-threading box. As you can see logical core 0 must be mapped to CPU id 0 and 16.
...
Internal processor ids for core 0: 0 16
Internal processor ids for core 1: 1 17
Internal processor ids for core 2: 2 18
Internal processor ids for core 3: 3 19
Internal processor ids for core 4: 4 20
Internal processor ids for core 5: 5 21
Internal processor ids for core 6: 6 22
Internal processor ids for core 7: 7 23
Internal processor ids for core 8: 8 24
Internal processor ids for core 9: 9 25
Internal processor ids for core 10: 10 26
Internal processor ids for core 11: 11 27
Internal processor ids for core 12: 12 28
Internal processor ids for core 13: 13 29
Internal processor ids for core 14: 14 30
Internal processor ids for core 15: 15 31
...
NUMA topology : [SCTTCTTCTTCTTCTTCTTCTTCTT][SCTTCTTCTTCTTCTTCTTCTTCTT]
NUMA node of core 0 on socket 0 : 0
NUMA node of core 1 on socket 0 : 0
NUMA node of core 2 on socket 0 : 0
NUMA node of core 3 on socket 0 : 0
NUMA node of core 4 on socket 0 : 0
NUMA node of core 5 on socket 0 : 0
NUMA node of core 6 on socket 0 : 0
NUMA node of core 7 on socket 0 : 0
NUMA node of core 0 on socket 1 : 1
NUMA node of core 1 on socket 1 : 1
NUMA node of core 2 on socket 1 : 1
NUMA node of core 3 on socket 1 : 1
NUMA node of core 4 on socket 1 : 1
NUMA node of core 5 on socket 1 : 1
NUMA node of core 6 on socket 1 : 1
NUMA node of core 7 on socket 1 : 1
Update:
If you have Intel developer tools installed, you can also use the Intel "cpuinfo" tool for getting the OS internal processor ID out of the "logical core" id. "cpuinfo -d" does a node decomposition and shows packge id (socket number), cored ids (the logical ones) and processors (as pairs when hyperthreaded). But you still need to multiply the package ID with the core ID in order to get the "absolut logical core ID" and then have a look at the right processor pair entry.
Using SGE_LOAD_AVG Environment Variable for Changing qstat -f Output (2012-07-24)
Normally you get with qstat -f (besides other values) the load_avg value which is the medium (5 min. avg. OS run-queue length in Linux) load of a machine. This is the same value which you will get with the „uptime“ command on the specific host. Sometimes it is useful to change the load output of qstat -f (and qstat -f -xml) to a value different to load_avg, like when your load formula in the Grid Engine scheduler is different. The default value can be changed in all Grid Engine versions with the undocumented environment variable SGE_LOAD_AVG.
When you want to change the load value column of qstat -f to lets say the normalized load (normalized through the amount of available processors) derived from the 5 min. load interval you can simply export SGE_LOAD_AVG=np_load_avg before doing a qstat -f.
Using this value is much more „natural“ in Grid Engine since it is used in other outputs and especially as default load formula in the scheduler as well.
Update: With Univa Grid Engine (UGE) 8.1 qhost and qstat are showing the normalized (np_load_avg) per default. This is less confusing since Grid Engine internally usually uses the load / #amount of processing units to calculate the host list order. This is the order the jobs are going to be placed (least loaded host in terms of np_load_avg (and not load_avg) first). For SGE 6.2u5 backward compatibility you can set SGE_LOAD_AVG to load_avg for qstat and SGE_REAL_LOAD=1 for the old qhost behavior.
Job Accounting and Cluster Usage in Univa Grid Engine (2012-07-17)
This article introduces the different methods how cluster usage can be accessed in Univa Grid Engine
Job accounting and cluster usage data can be accessed in Univa Grid Engine at different layers. The most basic layer is accessing raw text files generated by Grid Engine at runtime. After a default installation the qmaster process writes out an accounting file which can be found at $SGE_ROOT/default/common/accounting. It contains information about past jobs, which already finished and the (runtime) system. The layout of the file is described in the man page (man 5 accounting). This file is accessed directly by the qacct command line tool, which also requires a running qmaster where qacct connects to in order to get some lists. The second text file (contained in the same directory) is the reporting file. In order to let qmaster write the file it must be activated (qconf -mconf and then setting reporting from false to true in the reporting_params row). The structure is described in the man page reporting.
Univa Grid Engine also includes a package called ARCo which, when installed starts a process called dbwriter. The job of dbwrites is to parse both files and writes the content into a SQL database (preferably PostgreSQL). After doing this the actual data is usually deleted from the reporting file. The SQL interface can be seen as the most flexible interface to derive reports from the cluster because all data is stored there in a structured form for long time. It can be processed by an huge amount of tools which offers SQL access.
The commercial version of Univa Grid Engine comes with an additional tool: UniSight. UniSight allows not just a single view over different Grid Engine (and other resource manager) installations, it also loads the data into a Data Warehouse in order to get fast reports about jobs metrics and cluster usages even when you have huge amount of jobs. It provides a web interface where you can configure, store and run different reports including graphics and different ways to export the data (like PDFs, Excel formal, or CSVs).
The following picture illustrates the different ways of how to get information about your cluster usage and job accounting in Univa Grid Engine.
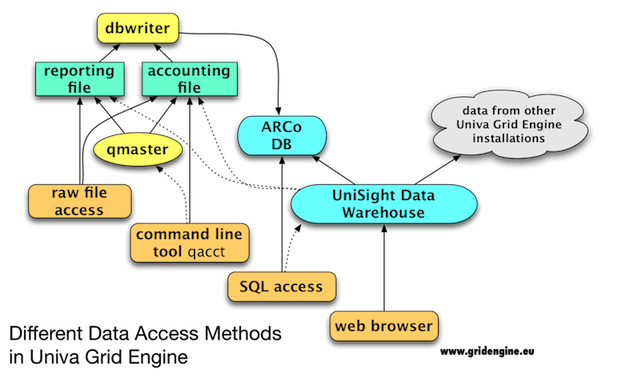
Univa Grid Engine 8.1 Overview (2012-07-15)
My colleague Ernst has assembled an overview about what's new in Univa Grid Engine 8.1.
Univa Grid Engine 8.1 Enhancement (Part 6) - Configure the Parallel Environment (PE) Selection Order (2012-06-09)
This enhancement was already implemented for the patch release 8.0.1p5. But since it wasn‘t in the 8.0.1 FCS I denote it here as an 8.1 enhancement (the real truth is that I don‘t want to mix up 8.1 and 8.0.1 features in my blog order...;-).
One common problem Grid Engine administrators are facing is that they have parallel applications which only run with a specific amount of slots (ranks / cores) per host optimally. Let‘s assume that you have one which can deal with 64 slots per host as well as with 32 slots per host with a preference for 64 slots per host. How could this now be configured in Grid Engine?
For parallel jobs (i.e. jobs which need more than one slot / core) you need to configure a so called parallel environment. This parallel environment can then be selected during job submission time with the qsub -pe <your_PE> <total_amount_of_slots_you_need> switch. If you want a fixed amount of slots per host you have to define this in the PE config (qconf -mp <yourpe> or for creating a new one qconf -ap <yourpe>) in the allocation_rule section. Here just enter the amount of slots you need per host, like 64. When requesting this PE the total amount of slots must be a multiple of 64. Then the Grid Engine scheduler tries to find hosts which offers enough resources for 64 slots. But if there aren‘t enough then the job stays waiting in the queue (qw). But now you want that the scheduler tries to place the job with using just 32 slots per host. This is usually done by creating a second PE with a fixed allocation rule of 32. Let‘s assume you named them my_pe_064 and my_pe_032 respectively. Then all what you have to do is choosing the PEs during submission time with the wildcard PE selection: qsub -pe my_pe_\* ...
But now the scheduler chooses (for the admin and user) an arbitrary one, i.e. it could be that the jobs runs with 32 slots per host while it was possible that the jobs could also use 64 slots per host!!!
In order to determine the PE selection order in the scheduler, Univa Grid Engine comes with an scheduler parameter which allows you to configure that it should be either in (alphabetically) ASCENDING or DESCENDING (or like before with NONE) order depending on your naming schema of your PEs.
In our example all what you have to do is adding PE_SORT_ORDER=DESCENDING in the scheduler config (section: params) by qconf -msconf . Then the scheduler first checks if the 64 slots per host PE can be fulfilled if not it tries the 32 slots PE, guaranteed. That's it!
And by the way: The scheduler never mixes different PEs for one single job (i.e. in our example that one job never has 32 slots on one host while on another it gets 64 slots at the same time; it has always has either 64 slots or 32 slots all hosts but now with a preference for 64 slots).
Univa Grid Engine 8.1 Features (Part 5) - Fair Resource Urgencies: Balance Usage of Arbitrary Resources (2012-06-05)
Resource urgencies can be set in the so called complex configuration with qconf -mc. One prominent example is the „slots“ resource which comes with a default urgency of 1000. This leads to the fact that jobs requesting a higher amount of slots (which is done with using parallel environments during job submission time) will get a higher overall priority (because resource urgencies are part of the priority calculation) when no other special policy is activated.
Resource urgencies are often used to fully load expensive resources through pushing jobs requesting such a resource to the top of the pending job list. In case of the "slots" resource the intention is that bigger jobs should be scheduled first in order to avoid starvation of those jobs.
With the advent of Grid Engine 8.1 resource urgencies can also be used to balance usage of arbitrary resources. Load balancing can be configured in Grid Engine also in different other ways: We have a share-tree which includes also historical information or you can use the functional policy which only respects current the cluster load. One known limitation is that those policies only work on a fixed set of objects (like users, projects, departments). This is where fair urgencies comes into play: They can be configured for any resource you like. The only thing you have to do is to add the specific resource complex name into the scheduler configuration. What the scheduler now does is it derives a different urgency value for each job in the pending job list depending on the amount of running jobs using this specific resource.
The following example will demonstrate load balancing:
When you have nine jobs running which are using already a resource A and in the pending job list one job requesting a resource A and one requesting a resource B (which is currently unused) then the scheduler will give the job requesting resource B the full amount of urgency points while the job requesting resource A will get just a tenth of the configured urgency points. Hence the job which requests resource B will be pushed in the pending job list and the scheduler tries to balance jobs between those two resources.
In order to achieve this you have to give resource A in the complex configuration (qconf -mc) the same amount of urgencies (for example 100000) as for the resource B. Then you have to add both resources in new the scheduler configuration parameter „fair_urgency_list“.
Univa Grid Engine 8.1 Features (Part 4) - New Spooling Method: PostgreSQL Spooling (2012-06-01)
Grid Engine supported 3 different spooling methods in the past: classic spooling (where the data is written directly into files on the filesystem), berkeleydb spooling (where the data is written into a BDB file) and berkeleydb RPC spooling (which allowed RPC access to a non-local BDB data over the network). Since BDB RPC spooling was removed in UGE 8.0.0 because sleepycat (BDB) deprecated the RPC support itself there was a need to add a new safe spooling method with network access support. Local BDB spooling has the disadvantage that it only supports filesystems with POSIX file semantics (NFS4) but not NFS3, when it is opened in an non-private mode (which is needed since different processes may access the DB the same time!). Hence when having a fail-over configuration with a Grid Engine shadow daemon you couldn't use NFS3, which is still often found in compute clusters.
Now, with the advent of Univa Grid Engine 8.1 you have a third option again: PostgreSQL spooling. It combines the advantages of a fast and reliable DB driven spooling with supporting a fail-over configuration even on filesystems like NFS3. It is very simple to setup, too.
Btw.: PostgreSQL can be already configured in the DB writer, which collects your job accounting information and UniSight (which builds up data warehouses based on the DBs and visualizes your cluster usage) is also shipped with PostgreSQL.
Univa Grid Engine 8.1 Features (Part 3) - Simplified Debugging in Case of Failures (2012-05-30)
Another new enhancement of Univa Grid Engine 8.1 is that it simplifies debugging in case of problems during job execution. When you encounter that your job was not executed successfully on the execution host you want to get more details about the job execution context on the execution host. A primary source is usually the active_jobs directory on the execution host where all configuration files are stored temporary during execution time. After the job finished or failed it will be deleted hence you don‘t have any chances to go through the files.
In the past you could omit the deletion of the active_jobs directory by setting the execd_params to keep_active=true on the executions hosts (qconf -mconf <hostname>) where the jobs are failing. This kind of debugging had disadvantages: The amount of directories keep growing constantly even when most jobs were successfully executed and it always required to login to different execution hosts in order to collect the data.
With the new parameter keep_active=error the active_jobs sub-directory is copied to the master host before is is going to be deleted, but only for jobs which had errors. If you want to have all directories collected on the qmaster host before they are going to be deleted on the execution hosts, try to set keep_active=always.
Update: keep_avtive=error is now the default after a UGE 8.1 installation.
Univa Grid Engine 8.1.0 Features (Part 2) - Better Resource Management with the RSMAP Complex (2012-05-25)
Grid Engine deals with several different resource types like memory, resources which can be counted (integer), resources with names (strings/regex), resources with values (double), and boolean values. When you‘ve a countable resource on a specific host, for example a number of GPU cards, then Grid Engine can manage the amount of GPU cards, so that those hosts are not overloaded with jobs. But the jobs don‘t know which specific instance of GPUs they have to access. In older Grid Engine installations this is often solved by writing external scripts in order to manage access to the specific resources. With the introduction of the RSMAP complex this can now be handled by Grid Engine itself.
RSMAP (resource maps) are lists of strings which are managed by the Grid Engine scheduler. Because strings can represent arbitrary resource IDs this new complex type is very flexible. In the GPU example the list could be something like „GPU1 GPU2“. Such lists are then initialized in the „complex_values“ field of the execution host configuration, like integer and other resource types. Hence it is a per host resource.
The scheduler treats one item as of the list as an individual resource, but all of them are requested by the same resource name (the complex name) during job submission time. Additionally you can of course also request the amount of items your job needs. When a job now requests 1 of such a resource, then the jobs gets one of the „GPU1“ or „GPU2“ values attached. You can see the selected instance in the qstat output. The job itself can get the selected resource by reading out a special environment variable. If you want shared access to your resources, lets say 2 jobs are allowed to access one of the GPUs, you can easily configure that by creating a string list which has multiple same entries: „GPU1 GPU2 GPU1 GPU2“. So the first job will access the first GPU the second the second GPU and the third again the first GPU (in the first scheduler run). The order is the order of the currently unused items in the list. This concept can be used also for accessing licensees when you are using special IDs for accessing one. Since numeric IDs are very common you can create an ID list very easily by using following notation „<from>-<to>“, which creates strings with a number range. So "1-10" will create following list implicitly „1 2 3 4 5 6 7 8 9 10“.
Univa Grid Engine 8.1.0 Features (Part 1) - The New NUMA Aware Scheduler (2012-05-17)
For the UGE 8.1 release we will add several new features to Univa Grid Engine. One of them is an enhancement of the Grid Engine scheduler component: it is now completely NUMA aware! I.e. it does its scheduling decisions based on available NUMA nodes, occupied and free cores/sockets as well as on the NUMA memory utilization on the sockets. That also means that the CPU core selection algorithm is moved into the scheduler component. This comes with another advantage: It can now be guaranteed that you will get the requested binding on the execution host because the scheduler automatically selects only host which can fulfill your core binding request (and NUMA memory request).
The new resources (i.e. complexes), which are automatically available after the installation are containing also the cache hierarchy (level 1 to level 3).
hl:m_cache_l1=32.000K
hl:m_cache_l2=256.000K
hl:m_cache_l3=12.000M
The new NUMA topology string show the NUMA nodes of a host:
hl:m_topology_numa=[SCCCC][SCCCC][SCCCC][SCCCC]
In the NUMA topology string each bracket identifies a different NUMA node (usually a socket). The memory access latency depends on which NUMA node the process runs and on which socket the memory is connected. Hence the scheduler can set the memory allocation strategy in a way that only local (NUMA node local) memory is accessed. In case more than available memory is needed the scheduler can also set it to prefer local memory.
This is done with the new qsub parameter „-mbind“, which accepts following options:
- cores
- cores:strict
- round_robin
- nlocal
„-mbind cores:strict“ means that the process only will get memory from the NUMA zone in which it is running. Using memory from other NUMA nodes is not allowed.
„-mbind core“ means that the job prefer memory from it home NUMA zone. If there is no more memory it will allocate memory also from other NUMA nodes.
Both settings depend from a requested core binding (with -binding linear:1 for example).
„-mbind round_robin“ let the job allocate memory in an interleaved fashion. The net result could be a higher bandwidth but lower average latency depending on the hardware architecture. This memory allocation strategy does not require a core binding.
In order to handle the memory on the NUMA nodes (usually sockets) more resources are available on such architectures.
Here is an example of a 4 node (4 socket) host:
hl:m_mem_total=31.250G
hl:m_mem_used=1.953G
hl:m_mem_free=29.297G
hl:m_mem_total_n0=7.812G
hl:m_mem_free_n0=7.324G
hl:m_mem_used_n0=500.000M
hl:m_mem_total_n1=7.812G
hl:m_mem_free_n1=7.324G
hl:m_mem_used_n1=500.000M
hl:m_mem_total_n2=7.812G
hl:m_mem_free_n2=7.324G
hl:m_mem_used_n2=500.000M
hl:m_mem_total_n3=7.812G
hl:m_mem_free_n3=7.324G
hl:m_mem_used_n3=500.000M
The resource „m_mem_total“ is a consumable complex which is also reported as a load value by the execution daemon. It is also a very special one: When you are requesting this complex together with a memory allocation strategy it internally automatically turns the request into implicit host requests in order to decrement the NUMA node memory depending on the memory allocation strategy. Because during submission time you do not know how your job is distributed on the execution node it manages implicitly the memory bank (NUMA node) requests.
The following example will demonstrate this:
Assume you are submitting a two-way multi-threaded job (pe_slots allocation rule required in PE) together with the memory binding strategy „-mbind cores:strict“ (which means that the job is only allowed to use fast local memory) and you want to use 2 cores if possible on one socket. The application needs 4 gig in total, i.e. 2G per slot.This would result in following request:
qsub -mbind cores:strict -binding linear:2 -pe mytestpe 2 -l m_mem_free=2G yourapp.sh
Now the scheduler skips all hosts which don‘t offer 2 free cores (as well as slots) and have at least 4G of free memory. If there is an host where the job can be bound than additionally the NUMA memory banks are checked (m_mem_free_n<node> complex). If the app runs on 1 socket offering 2 cores in a row than the NUMA node must offer 4G in total, if not the host is skipped. If the host offers only 2 free cores on different sockets (NUMA nodes) than each of them must offer only 2G. The memory on the NUMA nodes is decremented according the job distribution, the job memory request and the jobs memory allocation strategy.
There is much more to say about it, especially for the "-mbind nlocal" complex, which comes with implicit binding requests but more about it later...
Exploiting the Grid Engine Core Binding Feature
For the 6.2u5 release of Sun Grid Engine (SGE) I designed and implemented a new feature called „core binding“. Because it was developed under an open source license it is available for the whole Grid Engine community, i.e. it can be found in any Grid Engine fork currently available. Along with this „core binding“ I enhanced the host architecture reporting and introduced new standard complexes for the host topology and numerical complex attributes for the amount of socket, cores and hardware supported threads the execution host supports. In Univa Grid Engine 8.0.0 and afterwards in Univa Grid Engine 8.0.1 some more enhancements were made, but more about them later...
What is „core binding“?
Core binding refers to the capability that Grid Engine is able to dispatch jobs (scripts or binary programs) to specific cores on an host not only to the host itself. The difference is that when a job is dispatched to an host then usually the operating scheduler places the jobs processes to sockets/cores depending on the OS scheduler policies. From time to time the process is moved from one CPU core to another, which can even include jumps to other sockets. For some applications (like HPC jobs, graphic rendering, or benchmarks) the movement between cores has visible influence in the overall job run-times. The reason for this is that caches are invalidated and must refilled again and that on NUMA architectures the memory access times differs depending on which core the job is running and on which memory socket memory was allocated. Also, in case of overallocation of an host (more slots/processes than compute cores), the run-times of the jobs (even when they are identical) varies a lot. For example when you submit 4 jobs on a dual socket machine (with 2 cores each) but each job spawns 4 threads, the run-time of the longest running job comparing to the run-time of the shortest job can be a multiple (even when the jobs are identical!).
With the „core binding“ feature it is now possible to dispatch the jobs to specific cores, which means in case of Linux that the job gets a core bit mask which tells the OS scheduler that the job is only allowed to run on specific cores. When you are now submitting the 4 jobs (each with 4 threads) to a 4 core host and you tell GE during submission time that you want to have 1 core for each job (-binding linear:1) then each of the job gets one core exclusively (with the exception of OS internal processes). So all 4 jobs running then on a different core where they never can be moved away by the operating system scheduler. When you are comparing now the job runtimes you will get very similar results. In many cases the program execution times are shorter because of the better caching behavior. When you are using a NUMA machine exclusively for a job, which has less slots (processes/threads) than cores you can also speed up your program by forcing it to run on different sockets. This increases the total amount of used cache.
In Sun Grid Engine 6.2u5 and its forks the „core binding“ functionality is turned off per default. The reason for this is the behavior on Solaris. Here processor sets are used which are working a little bit different. On Linux with core binding you make a process nicer, because you are excluding existing resources from being used by the process (something like saying „don‘t let me run on core 2 and 3“) hence no special right is needed. On Solaris you are allocating cores via processor sets. When such a processor set is granted than you own the resources exclusively (like saying „don‘t let other processes (even not OS processes) run my cores, just me“). This could be a problem in case you don‘t align slots to cores. A user could steal resources. But disabling the feature in a default installation on Linux is not needed.
Hence Univa Grid Engine / UGE 8.0.0 changed this. There is no extra execution daemon parameter for Linux needed (execd_params) anymore, it it active on Linux out of the box. On Solaris it must be still turned on (execd_params ENABLE_BINDING=true) by the administrator like before (if creating processors sets in the particular use-case is not an security issue).
Univa Grid Engine 8.0.0 also shows now the amount sockets, cores and hardware supported threads in the default qhost output. This was also part of the „core binding“ enhancement in SGE 6.2u5 but in this release only visible with „qhost -cb“ parameter. In order to get backward compatible output UGE provides the „qhost -ncb“ command. In order to see the core allocation in the qstat -j <jobnumber> output there is no extra „-cb“ parameter needed anymore (but again backward compatible output is available with „-ncb“).
How to submit jobs with „core binding“?
The submission parameter „-binding“ is used for telling Grid Engine a recommendation how the job has to be handled.
Following arguments can be used with -binding:
-binding linear:<amount>
Binds the job of <amount> successive cores. Grid Engine to find the socket with the most free cores first. This ensures load distribution over sockets in case of multiple core-bound jobs on the same execution host.
-binding striding:<amount>:<step-size>
Allows distribute the job over cores with a distance of <step-size>. This is useful in order to exploit all cache of a particular execution host.
-binding explicit:<socket>,<core>:...
Here a list of socket,core pairs specifies the execution cores for the job.
In all cases, when on the particular execution host the requested binding can not be fulfilled, the job run without any binding. You can see the actual binding with in the qstat -j <jobnumber> output.
Having only serial jobs in the cluster
When you have a GE cluster without any parallel jobs, exploiting the „-binding linear:1“ parameter makes much sense. It ensures that each job runs on a different host and hence ensures fairness even a job spawns lots of threads. In order to enforce this request for users without the need that their submission must be changed you can add the parameter in the sge_request file which is located in $SGE_ROOT/default/common/ (where „default“ is an example cell name) directory.
..to be continued... :)